Order Creation
Create and customize orders with the intuitive menu-driven interface, designed for both touchscreen and traditional input.
Overview
Order Creation allows you to:
- Start new dine-in or to-go orders
- Browse menu categories and items
- Add items with customizations and modifiers
- Adjust quantities and apply item-level discounts
- Submit orders to the kitchen
Navigation:
- Sidebar → Create Order
- Or from Tables view → New Order on any table card
- Or + Create Order button in any view header
Starting an Order
From Tables View
- Find an available table
- Click New Order on the table card
- The table is automatically selected
- Set party size and create
From Create Order Page
- Navigate to Create Order in sidebar
- Choose table or To-Go option
- Set party size
- Click Create Order
Order Setup Form
Table Selection
Choose where the order is assigned:
┌─────────────────────────────────────────┐
│ 📦 To-Go / Pickup                 [✓]  │
├─────────────────────────────────────────┤
│ ───────────── Tables ─────────────      │
├─────────────────────────────────────────┤
│ 🍽️ Table 1                              │
│ 🍽️ Table 2                              │
│ 🍽️ Table 3                        [✓]  │
│ ...                                     │
└─────────────────────────────────────────┘
Options:
- To-Go / Pickup: No table assignment (phone orders, walk-up pickup)
- Table [Name]: Assign to specific table
The badge below shows current selection:
- 📦 To-Go Order (orange badge)
- 🍽️ Dine-In (gray badge)
Party Size
Touch-friendly party size selection:
┌─────────────────────────────────────────┐
│           Party Size                    │
│                                         │
│   [ - ]     👥 3 Guests      [ + ]     │
│                                         │
│   [1] [2] [3] [4] [5] [6] [8] [10]     │
└─────────────────────────────────────────┘
Controls:
- Minus button: Decrease by 1 (min: 1)
- Plus button: Increase by 1 (max: 50)
- Quick select buttons: Common party sizes
- Active size is highlighted in orange
The +/- buttons are sized at 56×56 pixels for easy touch targeting on POS terminals.
Create Order Button
Click Create Order to:
- Create the order record
- Navigate to menu item selection
- Begin adding items
The order screen
The menu and the order sit side by side on one screen: the menu on the left, the order on the right. You never leave the order to add to it.
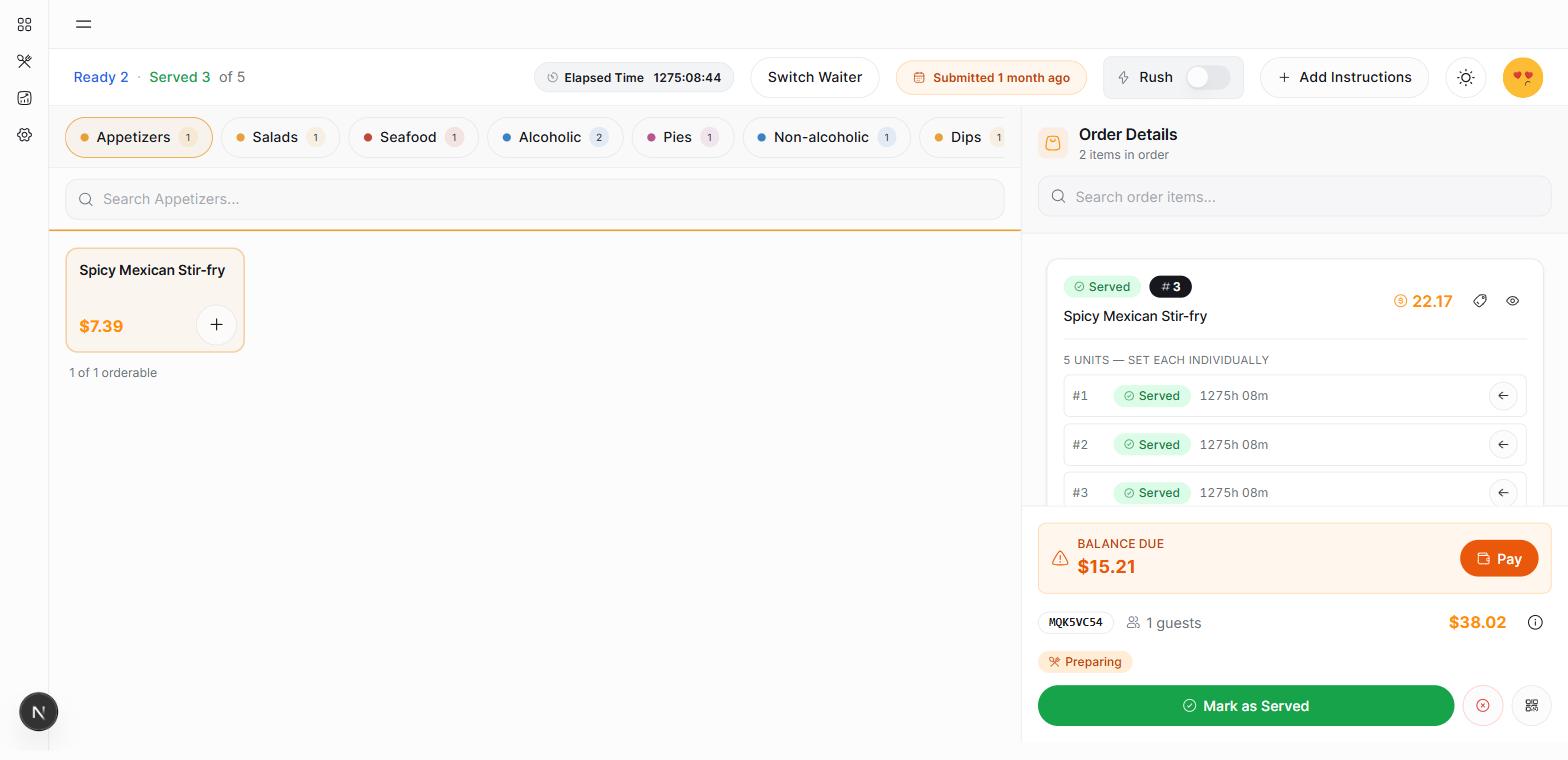
| Pane | What it holds |
|---|---|
| Left | The category rail, a search box scoped to the category you are in, and the item tiles |
| Right | Order Details — the lines, each line's plates, the balance due, and the action for the order as a whole |
| Top | How the order is doing (Ready 2 · Served 3 of 5), elapsed time, the server it belongs to, Rush, and Add Instructions |
Each category chip carries the number of items in it, so an empty category is visible before you open it.
The three-column screen this replaced is served at /v1 — add /v1 to the order's URL. Nothing links to it, and both screens read the same order and send the same mutations, so you can move between them mid-order without losing anything.
Menu Navigation
Item tiles
Each item shows its name, price and a + button. Under the tile, a line such as 1 of 1 orderable tells you how many can still be ordered — an item the kitchen has run out of says so here rather than failing after you tap it.
Tile information:
- Item name and price
- Description (if configured)
- Dietary indicators (vegan, vegetarian, etc.)
- Availability status
Searching Items
Use the search function to find items quickly:
- Click the search icon or press
/ - Type item name or keywords
- Results filter across all categories
Adding Items
Quick Add
For items without required customizations:
- Click the item card
- Select quantity in dialog
- Item is added to order
Quantity
Tapping the quantity control on a tile opens a numeric keypad, not a spinner. Type the number and confirm. Six of something is six taps of + on a spinner and two on a keypad, which matters when a table of twelve orders the same thing.
The keypad takes the category's colour, so it is obvious which item you are counting.
Items with Customizations
For items with modifiers or add-ons:
┌─────────────────────────────────────────┐
│ Classic Burger - $12.99                 │
├─────────────────────────────────────────┤
│ Temperature                             │
│ ○ Rare  ○ Medium  ● Well Done          │
├─────────────────────────────────────────┤
│ Add-ons (+$1.50 each)                   │
│ ☐ Extra Cheese  ☑ Bacon  ☐ Avocado    │
├─────────────────────────────────────────┤
│ Special Instructions                    │
│ [No onions, extra pickles_________]    │
├─────────────────────────────────────────┤
│ Quantity:  [ - ]  2  [ + ]              │
│                                         │
│ Total: $30.98                           │
│            [Add to Order]               │
└─────────────────────────────────────────┘
Customization Types:
- Radio buttons: Single selection (e.g., temperature)
- Checkboxes: Multiple selections (e.g., toppings)
- Text field: Special instructions
Order Summary Panel
The order panel shows current items:
┌─────────────────────────────────────────┐
│ Order #ZNP338                           │
│ Table 5 • 3 Guests • 15 min             │
├─────────────────────────────────────────┤
│ 2x Classic Burger          $25.98       │
│    - Well Done                          │
│    - + Bacon                            │
│                                         │
│ 1x Caesar Salad            $8.99        │
│                                         │
│ 3x Iced Tea                $8.97        │
├─────────────────────────────────────────┤
│ Subtotal                   $43.94       │
│ Tax (8%)                    $3.52       │
│ ─────────────────────────────────       │
│ Total                      $47.46       │
├─────────────────────────────────────────┤
│ [Submit to Kitchen]                     │
└─────────────────────────────────────────┘
Line actions
Every action on a line lives behind the line itself. Swipe it (or tap it, if swiping is awkward) and the actions appear beside it:
| Action | Does | Offered when |
|---|---|---|
| Edit options | Reopens the item's choices | the line is still unsent |
| Add one / Remove one | Changes the quantity by one | the line is still unsent |
| Set course | Moves the line to another course | nothing on the line has been sent |
| Discount | Applies a line discount | anything not cancelled or already settled |
| Mark served | Marks the line delivered | the kitchen has plates of it |
| Remove from the order | Takes the line off entirely | the line is still unsent |
Two things worth knowing:
Swiping reveals, it never fires. The swipe brings the buttons into view and stops; you still choose one. A swipe that went straight through to Remove would delete a dish every time a sleeve brushed a tablet.
The actions on offer are not all-or-nothing. Discount is deliberately wider than the rest — a dish already cooking can still be discounted, even though it can no longer be edited or removed. So a line may offer discounting and nothing else.
A line that can no longer be edited shows its kitchen status instead — Preparing, Ready — so the reason the buttons are gone is on screen.
What the line says
Each line shows the item, the quantity, and its customizations underneath. That matters at the table: a line reading 1x Cheeseburger looks the same with or without no pickles on it, and you cannot check a plate against a line that does not say what was asked for.
If the order has courses, the line also carries its course chip — C1, or No course for a unit added after its course was fired. An order with no courses shows no chip at all.
Courses
Before you submit, each item row has a Course picker (Course 1, Course 2…, or No course). On a coursed order the items are grouped under a heading per course, each with Send and Serve (n) shortcuts. See Courses.
Item Status Indicators
Once submitted, items show their status. The word comes from the kitchen, so it matches what the KDS shows:
| Status | Badge | Meaning |
|---|---|---|
| Ordered | ⬜ Gray | Unsent |
| Held | ⬜ Gray, dashed | Submitted, in a course nobody has fired |
| Sent / Preparing | 🟠 Orange | In the kitchen |
| Ready | 🔵 Blue | Plated, waiting for a runner |
| Ready to collect | 🟢 Green | Released by the pass |
| Served | ✅ Green | Delivered to table |
| Cancelled | 🔴 Red | Removed from order |
A line with several plates lists them under n units — set each individually, each with its own status.
Submitting to Kitchen
Submit Button
When the order has items, click Submit to Kitchen:
- The plates you send start Preparing, so the order reads Preparing
- Items in course 1 (and items in no course) appear on the Kitchen Display System; later courses are held until fired
- Kitchen begins preparation
- Timer starts for tracking
Adding More Items
After submission, you can still add items:
- Continue adding items to the order
- Click Submit to Kitchen again
- Only new items are sent
- Previously submitted items are unaffected
Order status flow
An order's badge is a summary of its plates rather than a fixed sequence — adding more items simply puts more plates at the start of the line. The full picture, with the plate statuses behind it, is in Order lifecycle.
Order Types
Dine-In Orders
- Assigned to a specific table
- Table shows as "Occupied"
- Visible in Tables view
- Completing the order frees the table
To-Go Orders
- No table assignment
- Table number shows as "To-Go/Pickup"
- Only visible in Orders view
- No table status affected
Converting Order Types
Use Move to Table to convert:
- Dine-in → To-go: Select "To-Go / No Table"
- To-go → Dine-in: Select a table
Rush Orders
Mark an order as high priority:
- Open order details
- Toggle the RUSH switch
- Order displays red highlighting
- Kitchen sees priority indicator
Use Cases:
- VIP guests
- Time-sensitive requests
- Making up for delays
Real-Time Updates
The order view updates automatically when:
- Kitchen marks items as prepared
- Items are served
- Payments are processed
- Other servers add items
Common Workflows
Taking a Standard Order
- Greet guests and note party size
- Click New Order on their table
- Set party size → Create Order
- Navigate menu categories
- Add items with any customizations
- Review order total
- Click Submit to Kitchen
- Confirm with guests
Handling Special Requests
- Add the item normally
- In customization sheet, use "Special Instructions"
- Type the specific request
- Submit to kitchen
- Instructions appear on KDS
Splitting Large Orders
If guests want separate checks from the start:
- Create first order for first group
- Add their items and submit
- Create second order for same table
- Add their items and submit
- Each order can be paid separately
Adding to Existing Order
- Open the existing order
- Browse menu and add new items
- New items show with different status
- Click Submit to Kitchen
- Only new items go to kitchen
Troubleshooting
Item Not Available
If an item is grayed out:
- Check with kitchen on availability
- Item may be 86'd (sold out)
- Update in SSP Manager if needed
Can't Submit to Kitchen
Check:
- At least one item is in the order
- There are unsent items — everything already in the kitchen stays put
- You have submission permissions
Wrong Customization Applied
- Find the item in order panel
- Click to edit
- Correct the customization
- If already submitted, may need to void item
Order on Wrong Table
- Go to Orders view
- Select the order
- Use Move to Table
- Select correct table
Related Features
- Tables Management - Finding and selecting tables
- Orders Management - Managing order list
- Payments - Processing payment after service
- Discounts & Refunds - Adjusting pricing