Table Management
Manage your restaurant's tables efficiently with SSP Manager's table management system. Create, organize, and monitor tables for optimal seating and service.
Overview
Table management allows you to:
- Create and configure tables
- Set seating capacities
- Organize tables by sections
- Assign tables to servers
- Track table status in real-time
- Manage reservations
Best for:
- Dine-in restaurants
- Cafés with seating
- Bars and lounges
- Any location with table service
Accessing Table Management
You must first navigate to a specific restaurant location to access Table Management. If you signed up as a single restaurant, you'll land directly at your location. For restaurant groups/chains, select your location from the Group/Chain Dashboard first.
Navigation Path: [Your Location] → Tables & Layout
Step-by-Step Access
- Navigate to your restaurant location (if using a Group/Chain, select it from the dashboard)
- In the sidebar, under Operations, click Tables & Layout
- Choose a tab:
- Layout — the floor plan editor, where you place tables on a map of the room. See The floor plan.
- Tables — the list of tables, described in the rest of this page.
- NFC & Ordering — NFC tags and ordering settings for each table.
Required Permission: Manager role
Creating Tables
Add a New Table
- Click + Add Table button in the top right corner
- A drawer will open for entering table details:
- Table Name: Display name for the table (e.g., "Table 1", "Window Booth")
- Number of Seats: Maximum seating capacity
- Click Save to create the table
Use a consistent naming scheme:
- Sequential: Table 1, Table 2, Table 3...
- By location: Window 1, Patio 1, Bar 1...
- Descriptive: Corner Booth, Large Round Table
The floor plan
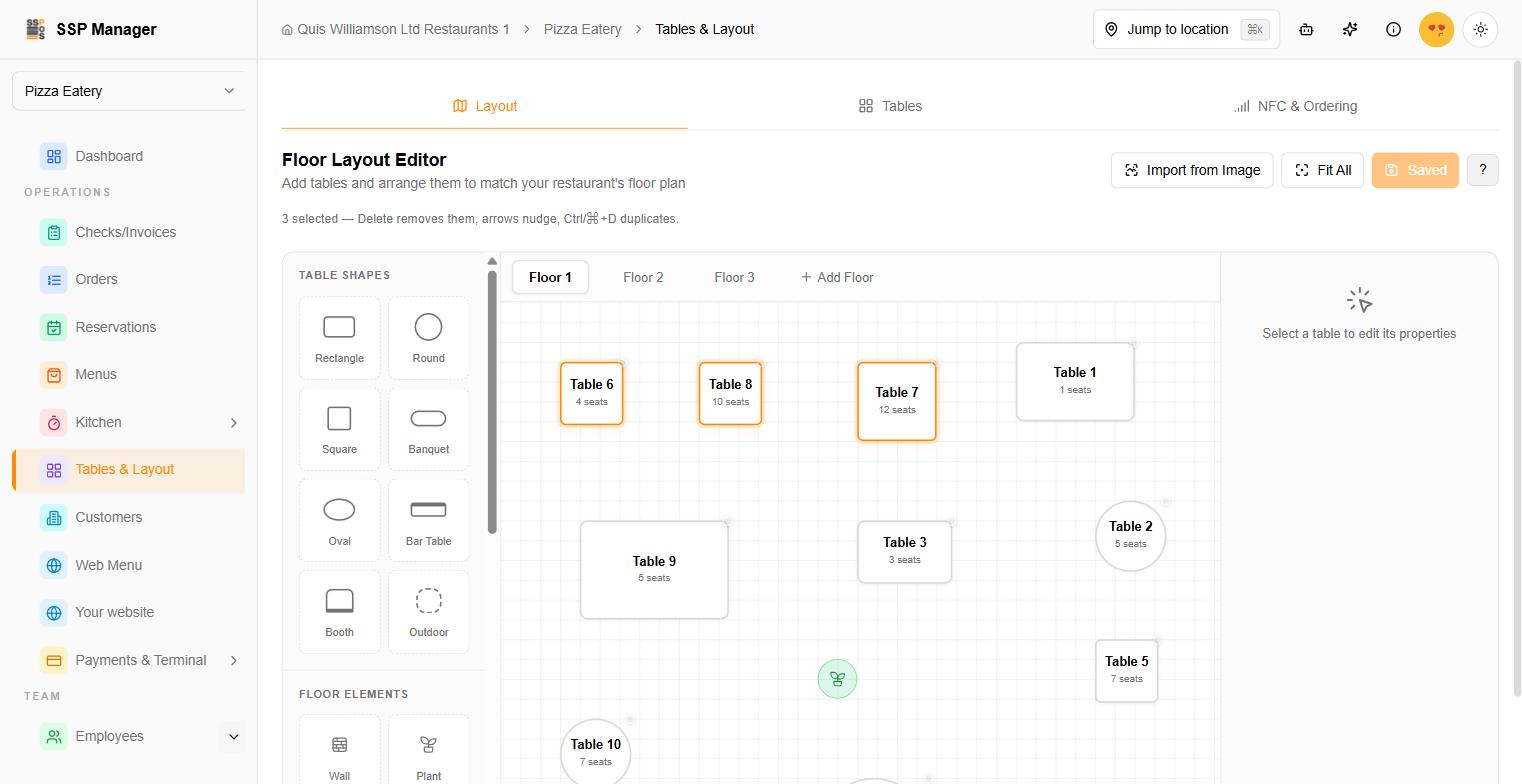
The Layout tab is a map of your room. Drag table shapes and floor elements (walls, doors, the bar counter, plants, restrooms and so on) from the left-hand panel onto the plan, move them where they really are, and your staff see the same plan when they pick a table. Use Add Floor for each level or room, and Fit All to bring everything on the current floor into view.
Click a table to edit its name, shape, seats, size and section in the panel on the right. Changes to the plan are kept when you click Save, or press Ctrl/⌘ + S. The button reads Saved when there is nothing left to save.
Working with several things at once
Hold Shift and click to add a table or element to the selection, or to take it out again. Ctrl/⌘ + A selects everything on the floor you're looking at. With several things selected, a line above the plan confirms how many (3 selected), and you can nudge, duplicate or delete them together.
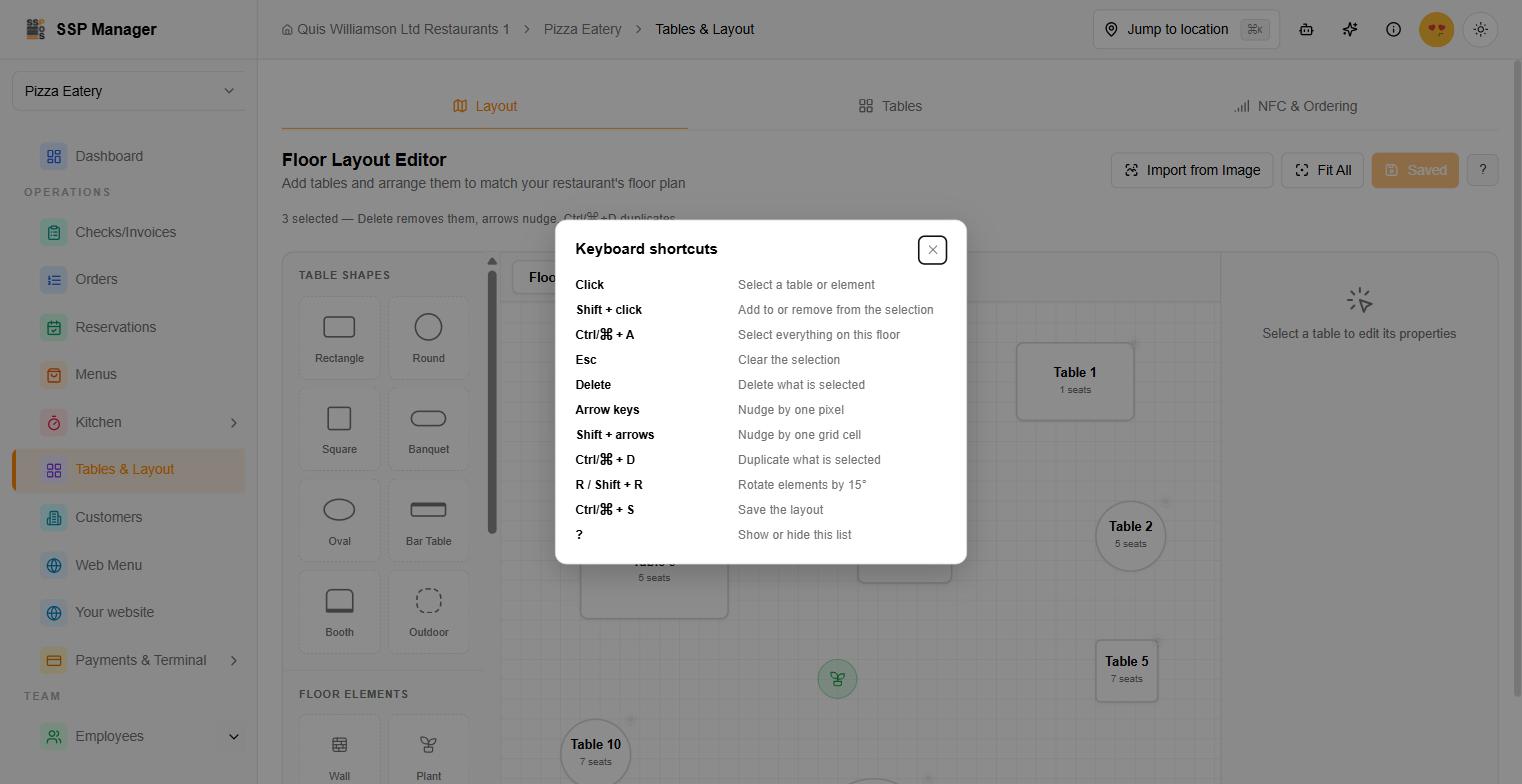
Keyboard shortcuts
Press ? or click the ? button beside Save to see this list in the editor.
| Keys | What it does |
|---|---|
| Click | Select a table or element |
| Shift + click | Add to or remove from the selection |
| Ctrl/⌘ + A | Select everything on this floor |
| Esc | Clear the selection |
| Delete or Backspace | Delete what is selected |
| Arrow keys | Nudge by one pixel |
| Shift + arrows | Nudge by one grid cell |
| Ctrl/⌘ + D | Duplicate what is selected. Copies of tables get new, unique names. |
| R / Shift + R | Rotate floor elements by 15°, clockwise / anticlockwise |
| Ctrl/⌘ + S | Save the layout |
| ? | Show or hide the list |
Shortcuts are paused while you're typing in a field, so renaming a table to Table 4 never deletes anything.
Deleting a saved table from the plan removes it from your location straight away, just as Delete Table does in the list — you don't need to click Save, and it can't be undone. A table with open orders can't be deleted; you'll be told why and it stays on the plan. Floor elements, and tables you've added but not saved yet, only disappear for good when you save.
Table Sections
Sections help you organize tables into logical groups for better management and server assignments.
Creating Sections
- Click the + Create Section button in the table management toolbar
- Enter the section details:
- Section Name: Descriptive name (e.g., "Main Dining", "Patio", "Bar Area")
- Click Save to create the section
Common Sections:
- Main Dining Room
- Patio/Outdoor
- Bar Area
- Private Dining
- Window Seating
Managing Sections
Access section management via the menu (three dots icon) in the toolbar:
- Click the menu icon (⋮) next to the + Create Section button
- Select Manage Sections
- In the Manage Sections drawer, you can:
- Rename a section
- Activate/Deactivate sections
- Change Display Order of sections
- Delete sections (tables will become unassigned)
Assigning Tables to Sections
Individual Assignment:
- Find the table in the table list
- Click the Section dropdown for that table
- Select the desired section from the list
Bulk Assignment:
- Select multiple tables using the checkboxes in the table list
- When 2 or more tables are selected, a Bulk Assign Section button appears
- Click Bulk Assign Section
- Select the section to assign all selected tables to
- Click Assign
Viewing and Managing Tables
Table List View
The table management interface displays all tables in a list format with:
- Table ID: Unique identifier
- Table Name: Display name
- Seats: Number of seats/capacity
- Section: Assigned section (or "Unassigned")
- Actions: Edit and delete options
Sorting and Filtering
Sorting: Click any column header to sort the table list by that column.
Filtering:
- Use the Filter dropdown to filter by specific columns (Table ID, Name, Seats)
- Use the Section dropdown to filter tables by section or view unassigned tables
- Use Clear Filters to reset all filters
Editing a Table
- Click the menu icon (⋮) in the Actions column for the table you want to edit
- Select Edit Table
- Update the table details in the drawer that opens
- Click Save to apply changes
Deleting a Table
- Click the menu icon (⋮) in the Actions column for the table you want to delete
- Select Delete Table
- Confirm the deletion in the dialog that appears
Deleting a table is permanent and cannot be undone. Make sure you want to remove the table before confirming.
Best Practices
Naming Conventions
Small Restaurant (< 20 tables):
- Simple sequential: Table 1, Table 2, Table 3...
- Easy for staff to remember
Medium Restaurant (20-50 tables):
- Section-based: Patio 1, Patio 2, Main 1, Main 2...
- Helps identify location quickly
Using Sections Effectively:
- Group tables by physical location (Patio, Main Dining, Bar)
- Assign sections for server assignments
- Use sections for shift planning and staff scheduling
Capacity Planning
Recommended Seating Distribution:
- 40% two-tops (2 seats)
- 40% four-tops (4 seats)
- 15% six-tops (6 seats)
- 5% eight-tops+ (8+ seats)
Adjust based on your typical party sizes.
FAQ
Can I delete a table?
Yes, you can delete tables using the delete option in the Actions menu.
Can I have duplicate table names?
While technically possible, it's recommended to use unique names for each table to avoid confusion.
How do I organize tables by area?
Use Sections to group tables by area (e.g., Patio, Main Dining, Bar Area). Create sections via the + Create Section button and assign tables to them.
How do I assign multiple tables to a section at once?
Select multiple tables using the checkboxes, then use the Bulk Assign Section button that appears when 2+ tables are selected.
Related Features
- Shift Management - Staff scheduling and assignments
- Menu Management - Managing your menu items
Getting Help
Need assistance with table management?
- 📧 Email: support@ssppos.com
- 💬 Live Chat: Available in dashboard
- 📚 Help Center: docs.ssppos.com
Organize your restaurant seating with SSP Manager Table Management.