Menu Management
Build and run your menus in SSP Manager: the menus themselves, the items on them, the options guests can choose, and the categories that organize everything.
What you set here is what your waiters can sell and what guests see on your website. A menu outside its schedule can't be ordered from. An item marked unavailable can't be ordered. An item hidden from the website stays on the tills. Get these right and both your staff and your guests see the right menu.
Where to find it
Navigation path: [Your Location] → Menu & online → Menus
If your restaurants are grouped into a chain, the group has its own Menus page too: from the Group/Chain Dashboard, open Menu & online → Menus. See Location menus and group menus.
Everyone on your team can open the Menus page. What they can change depends on their role: a button or switch you don't have permission for is not shown, or is shown as a read-only badge. See Roles & Permissions.
The four tabs
The Menus page has four tabs:
| Tab | What it holds |
|---|---|
| Menus | Your menus (Lunch, Dinner, Drinks…), each with its schedule and on/off switches |
| Items | Every dish and drink, with its price, photo, menus, categories and kitchen routing |
| Customizations | The options guests can add to an item (Extra cheese, No onions), and the selection rules that limit them |
| Categories | The sections items are sorted into (Starters, Mains, Desserts), with their color and kitchen routing |
Menus and categories are two separate ways of grouping items. A category does not live inside a menu. You choose an item's menus and its categories on the item itself, and an item can be in several of each. Caesar Salad can be on both your Lunch and Dinner menus and in the Salads category.
Grid and Table views
The Menus, Items and Categories tabs each have a Grid / Table switch at the top right:
- Grid shows one card per menu, item or category, with its switches and details at a glance.
- Table shows a compact list, one row each. It is quicker when you have a lot to look through or change.
The Items tab opens on the Table, where you can search, filter and sort every item. If you switch to Grid, SSP Manager remembers it, and the tab opens that way next time.
Location menus and group menus
If your restaurant belongs to a chain, there are two kinds of menus:
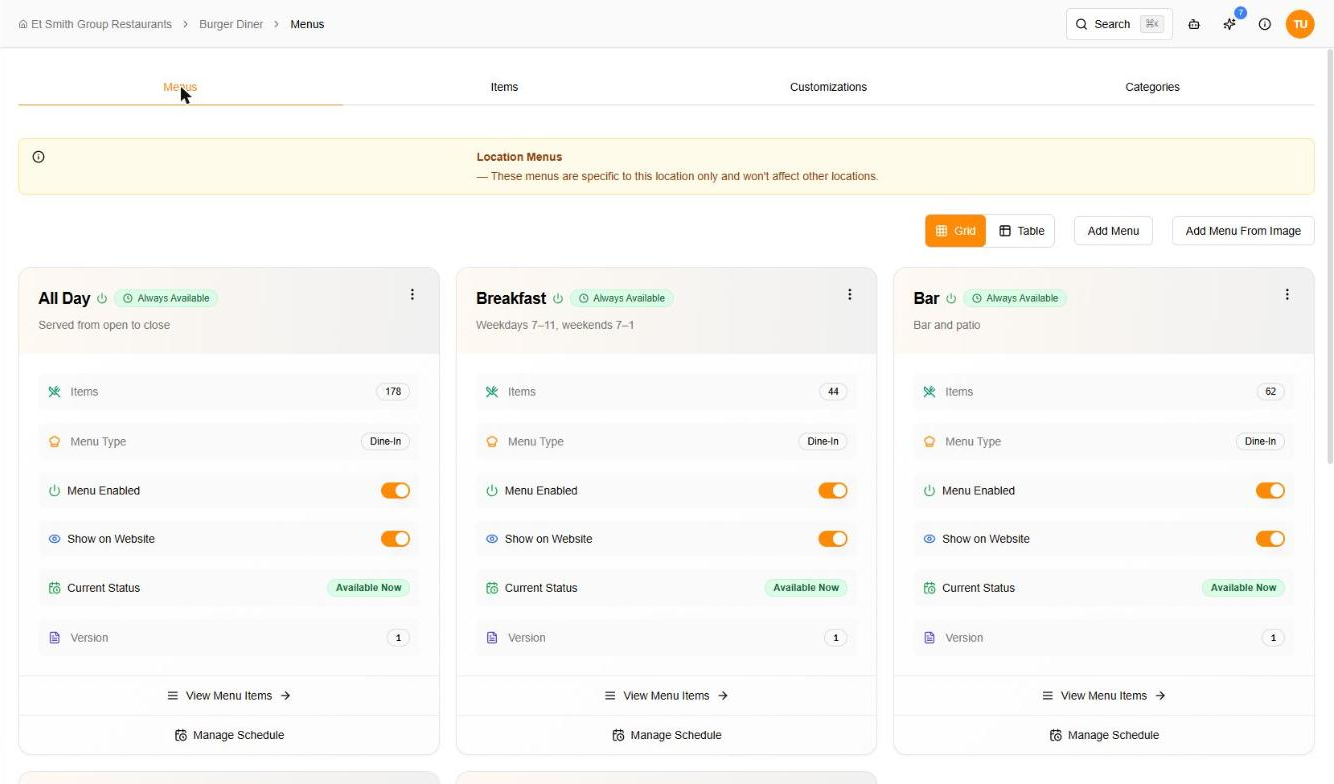
- Location menus are created from a location's Menus page. The page says so: These menus are specific to this location only and won't affect other locations.
- Group menus are created from the group's Menus page. Menus created here are shared across all locations in this group. Changes will apply to every location automatically.
A location's Menus tab lists its own menus first, then the group's menus. Make changes to a group menu, its items and its categories from the group's Menus page. A change there applies to every location in the group.
How group items look at a location
On a location's page, everything that comes from the group carries a Group: [group name] badge. Its fields show a lock, because they can only be changed on the group's page.
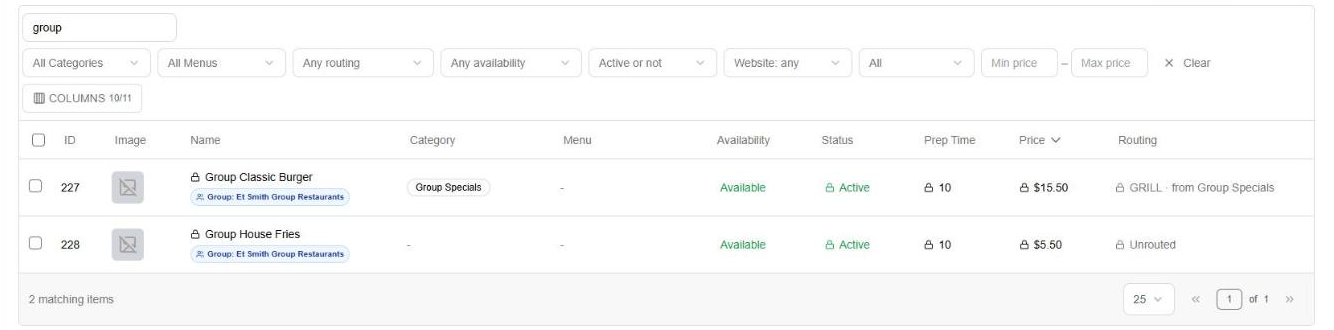
- On the Items table, the All / This location / Group filter shows only your own items or only the group's.
- A category from the group has an Edit in collection link on its card, which opens it on the group's page.
- If you select group items together with your own and run a change, the group items are skipped. The confirmation says how many, for example 2 managed by the group will be skipped. If every selected item would be skipped, the button reads Nothing to change.
A few things can still be set for one location only. On the Categories tab, a location can hide a group category, change its card color, or give it a different kitchen routing just for itself. Its ⋮ menu lists these as Hide category for this location, Card Color for this location and Kitchen Routing for this location. See The Categories tab.
On the group's own page, a change that reaches several locations says so before you confirm, for example This changes 4 locations: Burger Diner, Dessert Restaurant, Pizza Tavern and 1 more.
Quick start: import a menu from a photo
SSP Manager can read a photo of your printed menu and build the menu for you: items, prices, descriptions and categories.
- Open Menu & online → Menus. You land on the Menus tab.
- Click Add Menu From Image. On a location with no menus yet, click the Scan Your Menu card (marked Recommended) instead.
- In Upload Menu Image, click Upload Image.
- Drag your photos into the box, or click it to choose them. You can add up to 10 images at once, up to 20 MB each.
- Menu name (optional): leave it blank and the AI names the menus from what it reads, and can make more than one menu if your photos show several. Type a name, such as Lunch Menu, to put everything into one menu with that name.
- Click Upload.
- Wait while SSP Manager shows Processing Menu Image. This will take a minute.
When it finishes, the new menu appears on the Menus tab, and its items are on the Items tab. They are saved straight away. There is no preview step, so check them now.
During onboarding, the menu step can also import a menu from a PDF or a page on your website. See Onboarding → Menu setup.
- Use good light. Avoid shadows and glare.
- Keep each photo straight and sharp, so every price is readable.
- For a menu with several pages, add one photo per page in the same upload.
Checking and fixing an imported menu
Open the Items tab and switch to Table to see everything at once. Then:
- An item is missing: click Add Item and add it. See Adding an item.
- A price is wrong: click the price in the table, type the right one, and press Enter. See Changing values in the table.
- An item is in the wrong category: in Table view, click the × on the wrong category tag and + to add the right one. See Categories and menus as tags. For many items at once, select them and use Categories → Move to.
- A description needs work: open Edit and rewrite it.
- An item came in twice: tick the extra one and click Delete. See Working on several items at once.
Adding more items from photos
To add a new page to a menu you already have:
- On the menu's card, open the ⋮ menu.
- Choose Import more items from images....
- Upload the new photos, as above.
Duplicate items will be skipped. When it is done, SSP Manager tells you how many items it added, and which ones it skipped because the menu already had them.
The Menus tab
Creating a menu by hand
- On the Menus tab, click Add Menu. On a location with no menus yet, click Build Manually → Start from Scratch.
- Fill in the Create Menu form:
- Name (required): Lunch Menu, Dinner, Drinks.
- Description: a short line about the menu.
- Menu Type: a label of your choice, such as Dine-in, Takeout or Delivery.
- Version: a number for your own records. It starts at 1.
- Active: on by default. This is the same switch as Menu Enabled on the card.
- Click Create Menu.
Then add items to it. See Adding an item. To choose when the menu is available, give it a schedule.
The menu card
Each card shows:
- Items: how many items are on the menu.
- Menu Type and Version.
- Menu Enabled: the menu's master switch. See On, available and on the website.
- Show on Website: whether the menu appears on your website.
- A status badge next to the name: Always Available, Available Now, Scheduled or Inactive. A scheduled menu also has a Current Status row: Available Now or Not Available.
At the bottom of the card:
- View Menu Items opens a page with just this menu's items. Its Add Item to Menu button creates an item already on this menu.
- Manage Schedule opens the schedule editor.
The card's ⋮ menu has:
- Edit: change the name, description, menu type, version and Active, then click Save Changes.
- Configure Schedule: the same schedule editor.
- Import more items from images...: see Adding more items from photos.
- Delete: This action cannot be undone. This will permanently delete this menu.
In Table view, each row has View Items and the same ⋮ menu under Options.
Menu schedules
Outside its scheduled times, a menu is not available for ordering, and it is not shown on your website. It comes back on its own at the next scheduled time.
Open a schedule with Manage Schedule on the menu card, or ⋮ → Configure Schedule. The Schedule Configuration panel opens.
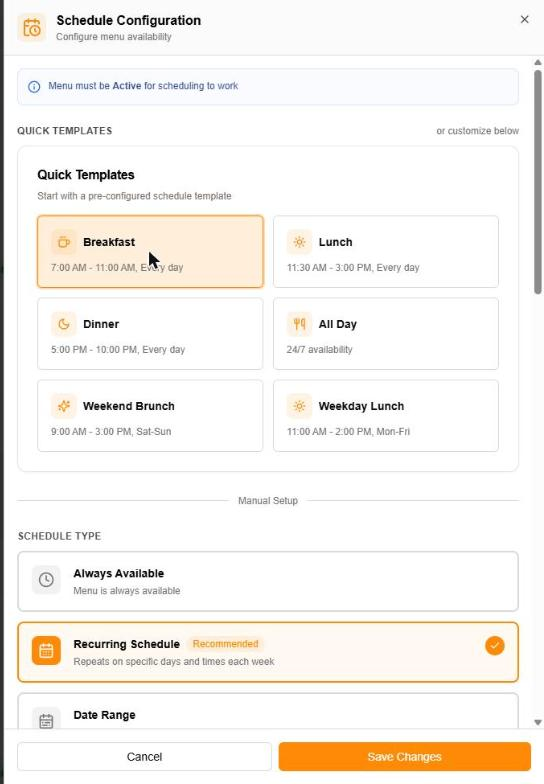
The menu must be switched on (Menu Enabled) for its schedule to work.
Quick Templates
Click a template to fill in the schedule for you, then adjust it below if you need to:
| Template | Days and times |
|---|---|
| Breakfast | Every day, 7:00 AM to 11:00 AM |
| Lunch | Every day, 11:30 AM to 3:00 PM |
| Dinner | Every day, 5:00 PM to 10:00 PM |
| All Day | 24/7 |
| Weekend Brunch | Saturday and Sunday, 9:00 AM to 3:00 PM |
| Weekday Lunch | Monday to Friday, 11:00 AM to 2:00 PM |
Schedule types
Under Schedule Type, pick one of four:
- Always Available: the menu is always available. You can still add special dates.
- Recurring Schedule (recommended): the menu repeats on the same days and times every week. Pick the Active Days (Mon to Sun) and the Operating Hours. Best for breakfast, lunch, dinner, happy hour and weekend brunch.
- Date Range: the menu is available between a Start Date and an End Date, during the Daily Operating Hours you set. Best for seasonal menus and limited-time offers.
- Manual Control: no automatic schedule. The menu is on or off only through its Menu Enabled switch.
The start time must be earlier than the end time. A schedule can't run past midnight.
Advanced: priority, special dates and preview
These settings appear for every type except Manual Control.
Priority. A slider from 0 to 100, set to 50 (Medium) to start with. When two menus are scheduled at the same time, the one with the higher priority wins. For example, give a Happy Hour menu a higher priority than the Dinner menu it overlaps.
Special Dates. Exceptions to the regular schedule, such as a holiday or a private event:
- Click Add Date.
- Pick the Date.
- Leave Available on this date off to close the menu that day. Turn it on to open it, and set a Start Time and End Time if the hours differ.
- Add a Note (Optional), such as Holiday hours.
- Click Add Date.
Each special date shows as Closed or Available. Use the bin icon to remove one.
7-Day Preview. A calendar of the next seven days, so you can see when the menu will be on before you save.
Click Save Changes. You'll see Schedule saved successfully.
The Items tab
The Items tab lists every item at this location (or in this group, on the group's page).
Adding an item
- On the Items tab, click Add Item. On an empty tab, click Get Started.
- Fill in the Create Item form:
- Name (required).
- Menu code: optional. Your own short code for the item, such as 21-a, shown instead of its number. Leave it empty to use the number. See Menu codes.
- Description (required): one or two sentences that make the dish appealing.
- Price (required): the base price, before any options.
- Image: one photo of the dish.
- Menus: every menu this item is on.
- Categories: every category this item belongs to.
- Kitchen Routing: leave it on None (inherit from category) unless this item cooks somewhere different from the rest of its category. See Kitchen routing.
- Active and Available: both on by default. See On, available and on the website.
- Preparation Time (min): how long the dish takes to make.
- Click Create Item.
To add allergens, open the item's Allergens row afterwards. See Allergens & Dietary Info. To add options, use Manage Customizations. See Adding customizations to an item.
Preparation Time sets expectations for everyone. Servers see how long an order should take, guests see the expected wait, and the kitchen uses it to pace the order. A 5-minute salad and a 25-minute steak should have different times.
Item cards
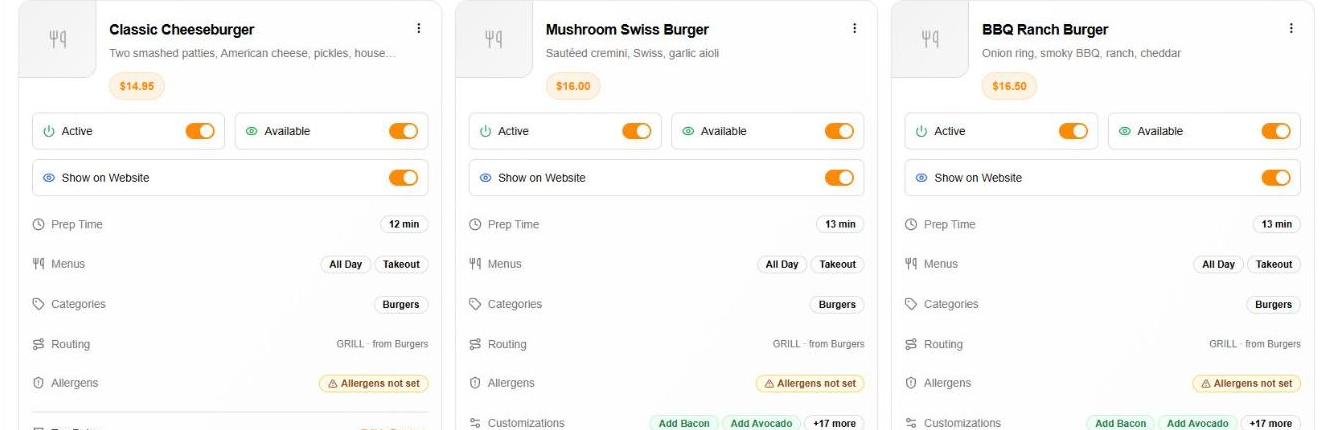
Each card shows the item's photo, its number or menu code above the name (#12, or 21-a), its description and price, then:
- Active, Available and Show on Website switches. See On, available and on the website.
- Prep Time, Menus and Categories.
- Routing: the kitchen station the item goes to, and where that comes from. GRILL · from Burgers means it follows its Burgers category. A class in bold is the item's own. See Kitchen routing.
- Allergens: click it to open the allergens sheet.
- Customizations: the options attached to the item.
- Tax Rules: the taxes that apply to the item at this location. See Taxes.
- Manage Customizations: see Adding customizations to an item.
A red icon on the photo means the item is inactive. An orange icon means it is unavailable.
The card's ⋮ menu has Edit, Allergens… and Delete. Deleting asks Delete Item? and can't be undone.
To find an item in Grid view, choose a field in Filter by (for example Name), then type in Search.
Changing an item's photo
- On the item's card, click the photo (or the empty plate icon). The tooltip says Click to upload image.
- In Upload Item Image, drag a photo in or click to choose one, up to 20 MB.
- Click Upload.
Each item has one photo. Photos from an iPhone are converted for you.
- Use natural light and a plain background.
- Show the real portion size.
- Skip filters, so the colors look like the real dish.
Editing an item
Open the card's ⋮ menu and choose Edit. The Update Item panel has the same fields as Create Item, including Menu code.
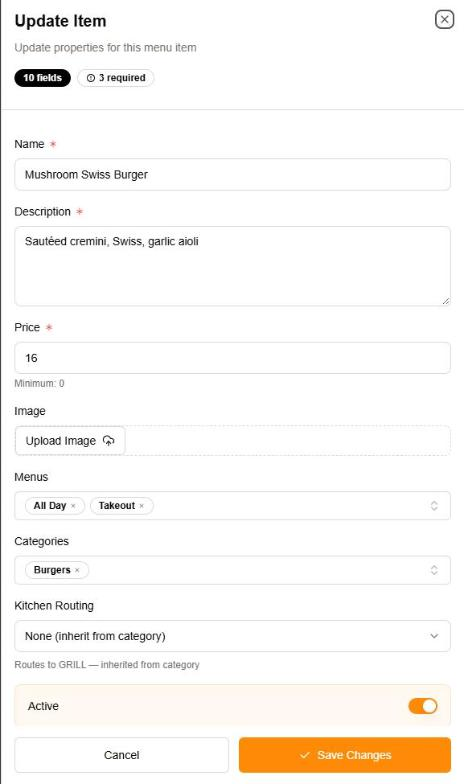
Under Kitchen Routing, a line tells you where the item is sent today and why, for example Routes to GRILL — inherited from category. See Kitchen routing.
Click Save Changes.
Table view
Switch to Table to see items as rows.
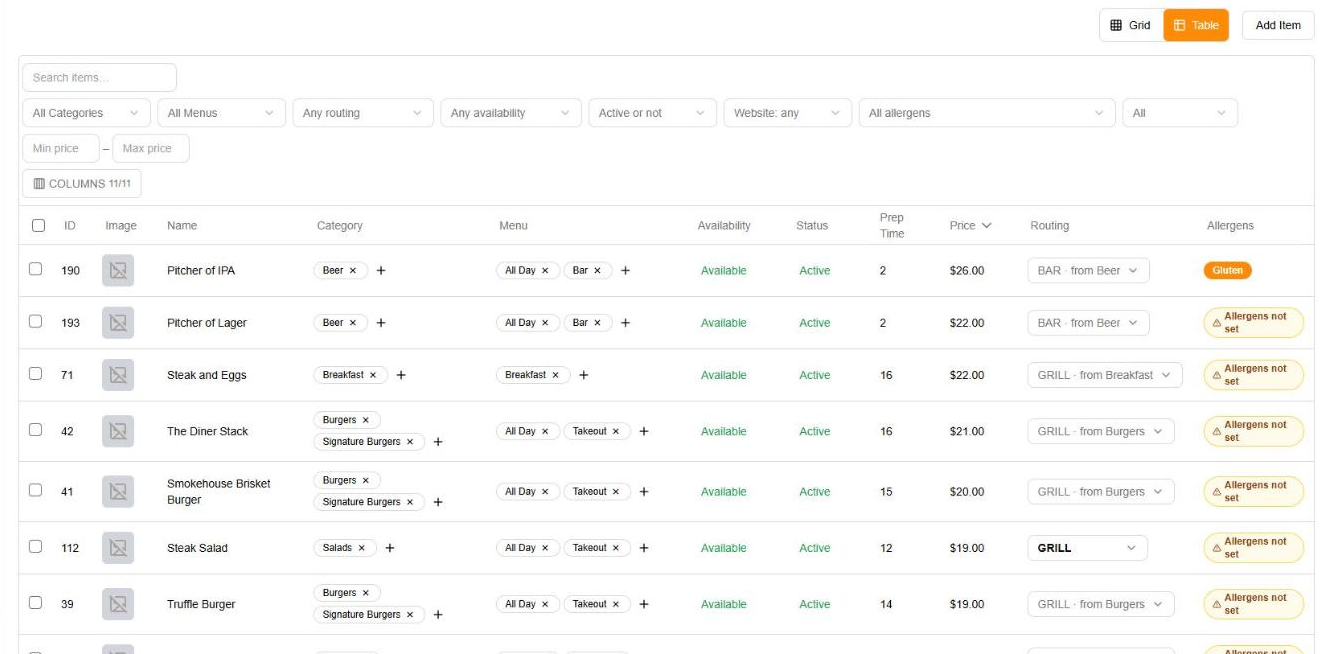
The columns are #, Image, Name, Category, Menu, Availability, Status, Prep Time, Price, Routing and Allergens.
The # column shows what your staff call the item:
- its menu code, such as 21-a, if you gave it one;
- otherwise its number, in grey. Each location numbers its own items from 1, in the order they were created. A number is never given to another item, even after the item is deleted.
- A group item has the group's number, written Grp-12. A group numbers its items separately from its locations.
- An item with neither shows —.
Searching and filtering
Search and filters work on all your items, not just the page you are looking at.
- Search name, code or #… finds items by name, description, menu code or number. Type a whole number, such as 7, to find item #7. Capitals don't matter.
- All Categories and All Menus narrow the list to one category or one menu.
- Any routing: items that follow their category, items with a class of their own, or the items of one routing class.
- Any availability: Available or Unavailable (86).
- Active or not: Active or Inactive.
- Website: any: On the website or Not on the website.
- All allergens finds items by allergen, or the items whose allergens are not set yet. See Finding items to review.
- All / This location / Group: on a location in a group, your own items or the group's. See How group items look at a location.
- Min price and Max price: a price range.
- Clear removes every filter at once.
The line under the table says how many items match. You can show up to 200 rows per page.
Sorting
Click a column heading to sort by it. Click it again to reverse the order. You can sort by #, Name, Category, Availability, Price, Routing and Allergens (how many allergens an item names). # sorts in natural order: 1, 2, 10, 21-a, AA.
SSP Manager remembers your search, filters, sort, columns and page size, so the table opens the way you left it.
Categories and menus as tags
In the Category and Menu columns, each of an item's categories and menus is a tag.
- Click the × on a tag to take the item out of that category or menu.
- Click + to add one. Type to find it. Your own categories come first, and the standard ones are listed under Built-in.
The change is saved straight away. A group item's tags can only be changed on the group's page.
Changing values in the table
You can change some values without opening the item:
- Click a #, Name, Prep Time, Price, Availability or Status cell. Clicking # edits the item's menu code.
- Type the new value, or flip the switch.
- Press Enter or click the green tick to save. Press Esc or click the red cross to cancel.
SSP Manager checks what you type before saving:
- A price must be a number of 0 or more, with up to 2 decimals. Anything else shows Enter a price of 0 or more, with up to 2 decimals.
- Prep time must be whole minutes: Enter whole minutes, 0 or more.
- A name can't be empty: Enter a name.
The Routing cell is a drop-down. Pick a routing class for the item, or Follow category to let it follow its category.
Working on several items at once
Tick the box at the start of each row, or the box in the header to select the whole page. When the whole page is selected and more items match your filters, Select all [n] matching selects them all, across pages. One change covers up to 200 items at a time.
A bar appears at the bottom of the screen:

| Button | What it does |
|---|---|
| Kitchen routing | Gives the items a routing class, or Follow category to take their own class away |
| Categories | Add to, Remove from or Move to a category. Move to takes the items out of their other categories. |
| Menus | Add to or Remove from a menu |
| Price | Set to a price, Raise by %, Lower by %, or Change by amount (such as +1.50 or -1.50) |
| Set codes | Gives each selected item its menu code, in one dialog |
| Mark unavailable (86) / Mark available | 86 the items, or bring them back, with an optional reason such as Sold out |
| Show on website / Hide from website | The items' Show on Website switch |
| Activate / Deactivate | The items' Active switch |
| Delete | Deletes the items. You can undo it right after. |
Each button opens a confirmation first. SSP Manager checks the items before you confirm, and the confirmation tells you:
- what will change. For a price, each item's old and new price.
- which items will be skipped and why, such as items managed by the group.
- for a delete, how many of the items are in open orders right now. Those orders keep them.
- on the group's page, which locations the change reaches.
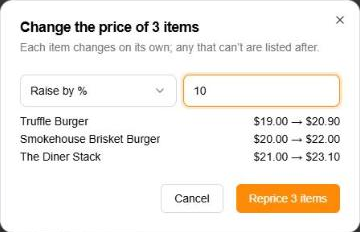
The confirm button names what will happen, such as Reprice 3 items or Delete 2 items.
When it's done, SSP Manager tells you how many items changed. If some could not be changed, it says how many and why, and keeps those items selected so you can try again.
Undo a delete. After a delete, the message 2 items deleted has an Undo button for about 10 seconds. Click it to bring the items back as they were.
Which buttons you can use depends on your permissions. Changing items needs permission to update menu items. Deleting needs permission to delete them. Marking items unavailable or available needs the 86 Menu Items permission.
Choosing columns
Click Columns to show or hide columns. The button shows how many columns are visible, for example 8/11.
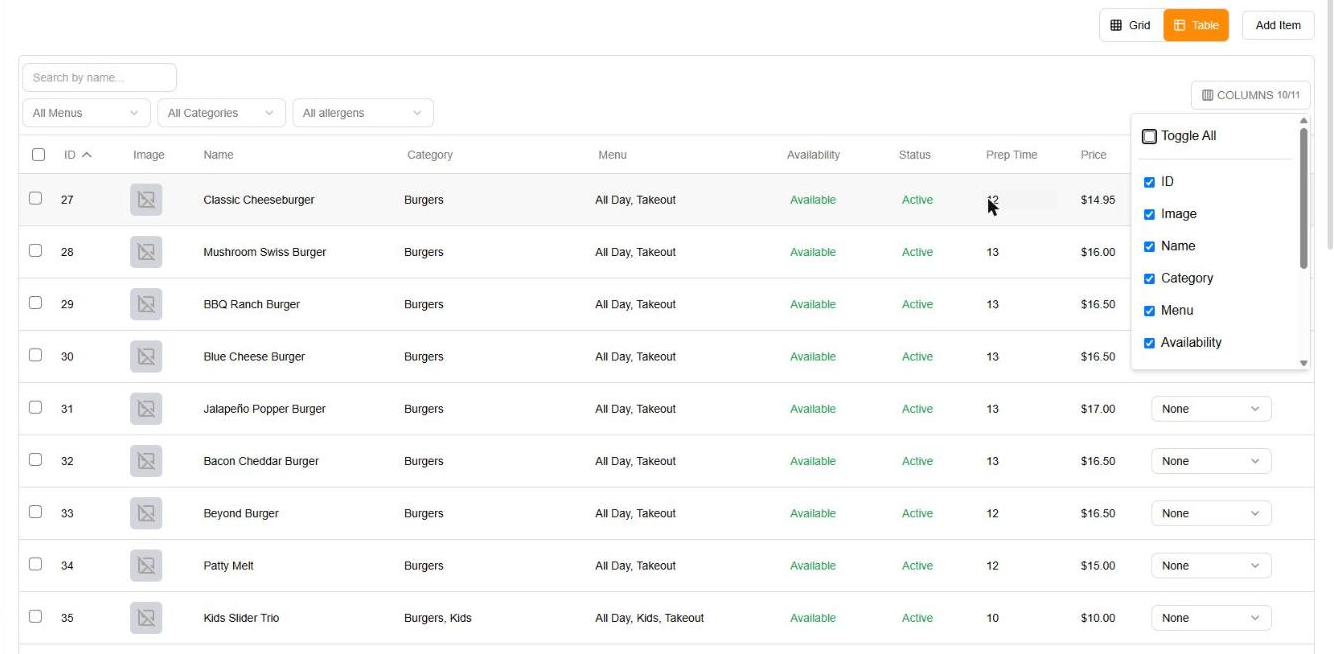
- Tick or untick a column to show or hide it.
- Toggle All shows every column, or hides all but #.
- At least one column always stays visible.
SSP Manager remembers how you sorted the table and which columns you hid, so the table opens the way you left it.
Items in one menu or one category
- On a menu card, View Menu Items opens Items in [menu]. Add Item to Menu creates an item already on that menu.
- On a category card, View Items opens that category's items. Add Item to Category creates an item already in that category.
Both pages have the same Grid and Table views as the Items tab. Their table shows the # column too, but doesn't sort by it.
Menu codes
Many restaurants print a code next to each dish, such as 21-a or Combo 1, and staff call dishes by it. Give an item its menu code and SSP Manager shows the code instead of the item's number.
Giving an item a code
- In the table: click the item's # cell. The number shows as a hint. Type the code and press Enter, or click the green tick.
- In the item form: fill in Menu code when you create or edit the item.
- For many items at once: select them and click Set codes in the batch bar. The dialog lists one row per item. Type each item's code as it's printed on your menu. Leave a field empty to show the item's number instead. Nothing is saved unless every code is free. The save button counts the codes you changed, such as Save 2 codes. You'll see, for example, Codes saved for 2 items.
To remove a code, empty the field and save. The item shows its number again.
What a code can be
- Up to 12 letters and digits, plus - and _. No spaces. It starts with a letter or a digit. Letters from any alphabet work.
- It can't start with Grp: that is how group items are written.
- Each code is used once in a location. Capitals, - and _ don't count when codes are compared, so 21-a, 21_A and 21A are the same code.
- A code can't be another item's number. An item may take its own number as its code.
If a code can't be used, SSP Manager says why before saving anything, for example 21A is already used by Caesar Salad (#15). or 22 is the number of Espresso. The field stays open so you can change it. In Set codes, each row that needs a change shows its reason, and no code is saved until every row is free. Two items can swap codes in one Set codes save.
Where guests see codes
When you give the first item of a location its code, SSP Manager tells you: Guests now see your codes in the ordering app, on the website menu and on receipts. Its Settings button opens the Menu codes card.
The Menu codes card is at the bottom of Settings → General. It has three switches, each saved on its own:
| Switch | What it does |
|---|---|
| Show codes in the guest ordering app | Guests ordering from a table QR code or for pickup see each dish's code next to its name. |
| Show codes on the website menu | Applies the next time you publish the web menu. |
| Show codes on receipts | Printed and emailed receipts list each dish's code before its name. |
All three are off until the location's first code turns them on. After that, they change only when you change them. Turn them off if you want codes for your staff only.
Changing these switches needs access to Settings → General (location managers and above).
On, available and on the website
Each item has three switches, and each menu has two. They do different jobs, and each one works independently of the others.
For an item
| Switch | When it's off | Use it when |
|---|---|---|
| Active | The item is off your menu everywhere: the staff apps and your website. It stays in SSP Manager. | The dish is discontinued, or out of season |
| Available | The item can't be ordered. Waiters don't see it in their item list, and your website shows it as sold out. | You've run out tonight (you "86" it) |
| Show on Website | The item is not on your website and can't be ordered online. Your staff can still sell it. | A dine-in-only special, or a staff meal |
All three are on for a new item.
For a menu
| Switch | When it's off |
|---|---|
| Menu Enabled | The menu is off every channel, tills included. Its schedule does nothing until you turn it back on. |
| Show on Website | The menu is not on your website. It stays on the tills. |
A menu with Show on Website on can still be missing from your website. The card tells you why: Not on your website — Menu Enabled is off, or Not on your website right now — outside its scheduled times. It comes back on its own.
86 an item during service
To take a dish off quickly, turn off Available on its card, or select it in the table and click Mark unavailable (86). You can add a reason, such as Sold out. Turn it back on when you have it again.
The kitchen can also 86 a dish from the kitchen screen, without opening SSP Manager. It flips the same Available switch. The kitchen screen can't put the dish back; do that here. See Working a Ticket → 86 a dish.
The kitchen control is shown only to people with the 86 Menu Items permission. Kitchen staff, floor managers, location managers and above have it. See Roles & Permissions.
An item that belongs to a group menu has one Available switch for every location in the group. Turning it off at one kitchen turns it off at every location.
The Customizations tab
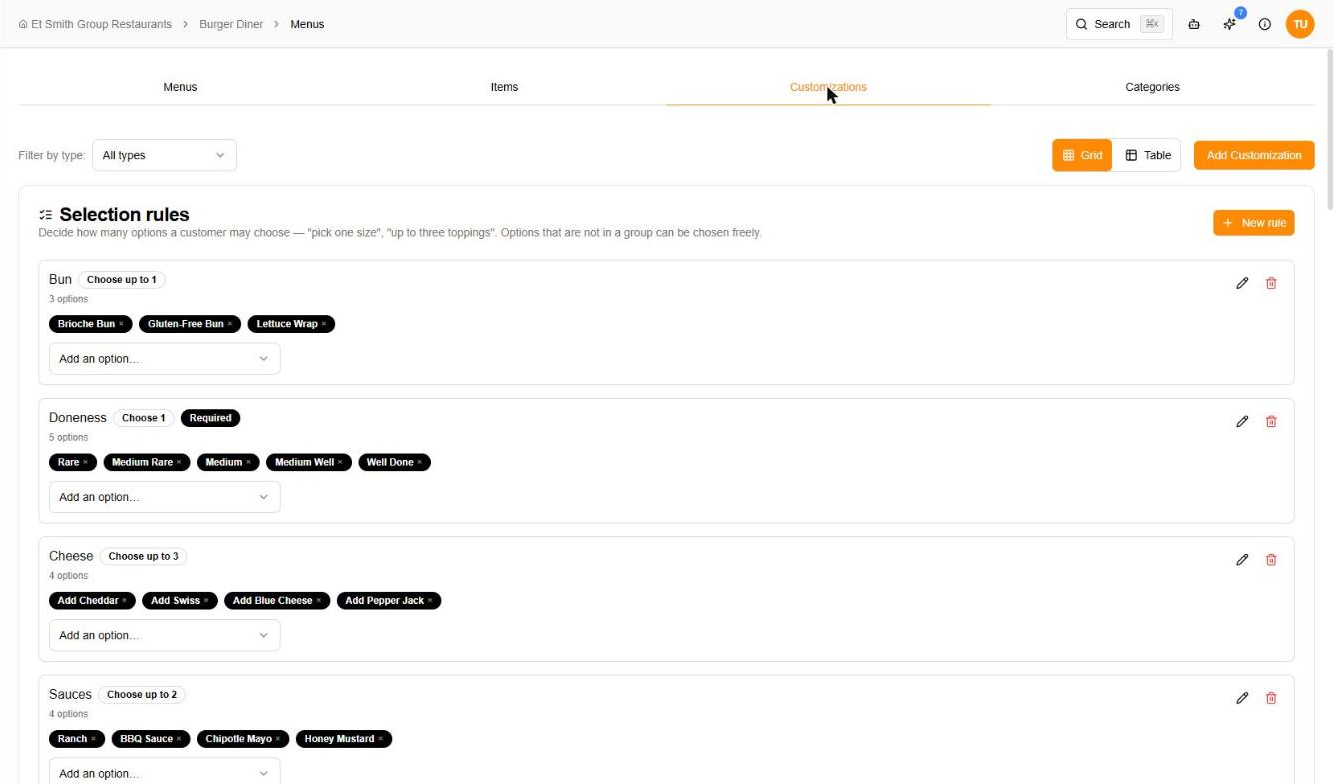
Customizations are the options a guest or waiter can add to an item: Extra cheese, No onions, Gluten-free bun. Each customization is one option, with its own price. You create it once and attach it to as many items as you like. Customizations appear in the waiter apps and on your website.
The four types
| Type | For |
|---|---|
| Add-on | Extra toppings and sides, usually with a charge: Extra cheese +$1.50 |
| Modification | Cooking style or spice level: Well done, Extra spicy |
| Removal | Taking something out: No onions, No nuts |
| Substitution | Dietary swaps: Gluten-free bun, Oat milk |
Use Filter by type: at the top of the tab to see one type at a time.
Creating a customization
- On the Customizations tab, click Add Customization. On an empty tab, click Create Your First Template.
- Fill in Create Customization Template:
- Name (required): Extra Cheese, No Onions.
- Description: optional.
- Price Adjustment (required): what the option adds to the price, 0 or more. Use 0 for a free option.
- Type (required): Add-on, Modification, Removal or Substitution.
- Active: Enable this template for use.
- Kitchen Routing: leave it on None (follows the parent item), or pick the station's class if the option is cooked somewhere else, such as Add fries → FRY.
- Click Create Template.
The customization card
Each card shows the option's price and type, then:
- Active: turn it off to retire the option. Inactive options are not listed in Manage Customizations.
- Used by: how many items the option is attached to. View Items lists them.
- Allergens: what choosing this option adds. See Options that add allergens.
- Routing: the option's kitchen routing, or Follows parent.
- Selection rule: the rule that limits the option, or Not set up. See below.
The ⋮ menu has Edit, Allergens & calories… and Delete. A change to an option applies to every item it is attached to. Deleting removes the option from every item using it, and can't be undone.
Selection rules: how many options a guest can pick
A selection rule groups options and says how many of them a guest may choose, such as pick one size or up to three toppings. Options that are not in a rule can be chosen freely. Their card says Not set up.
To create a rule:
- In the Selection rules panel at the top of the tab, click New rule.
- Give it a Name guests will understand, such as Size or Toppings.
- Set Must choose at least. 0 means the guest may skip it. 1 or more makes the choice required.
- Set Can choose at most. Leave it blank for no limit.
- Check the line Customers will see: and click Create.
| Must choose at least | Can choose at most | Customers will see |
|---|---|---|
| 1 | 1 | Choose 1 |
| 1 | 3 | Choose 1 to 3 |
| 2 | (blank) | Choose at least 2 |
| 0 | 3 | Choose up to 3 |
| 0 | (blank) | Optional |
The maximum can't be lower than the minimum, because nobody could order the item.
Then add options to the rule: under the rule, open Add an option… and pick one. Repeat for each option. An option can be in one rule only. Click the × on an option to take it out of the rule.
A rule with a minimum of 1 or more is marked Required. Use the pencil to edit a rule, and the bin to delete it. Deleting a rule keeps its options: customers will simply be able to choose them freely.
Selection rules are shared by all your locations. On each item, a rule applies to whichever of its options are attached to that item.
Adding customizations to an item
- On the Items tab, find the item's card.
- Click Manage Customizations.
- Tick the options this item should offer, and untick the ones it shouldn't. They are grouped by selection rule, each with what guests will see, such as Bun, Choose up to 1. Options that are in no rule come last. Each option shows its type and what it adds to the price, such as +$2.00, or No charge.
- Click Save Changes.
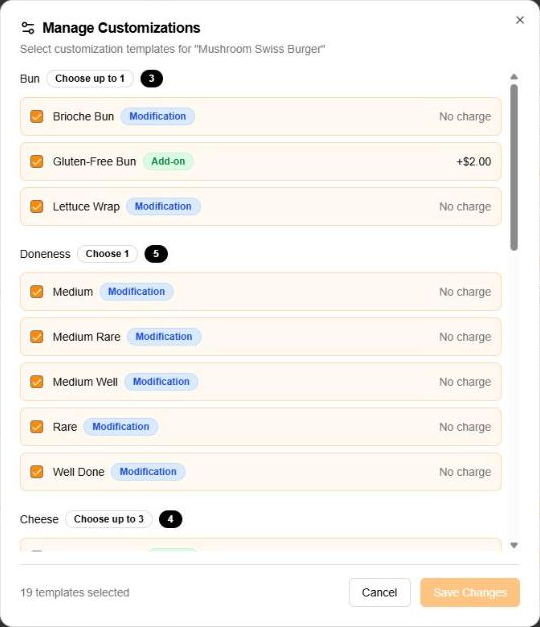
Only active options are listed. If the list is empty, create options on the Customizations tab first.
Example: pizza sizes and toppings
One Margherita Pizza item, with sizes and toppings as options, instead of three separate pizza items:
- Create the item Margherita Pizza at the small-pizza price, $14.
- Create three customizations of type Modification: Small (10") at $0, Medium (12") at $3, Large (14") at $5.
- Create a selection rule Size: at least 1, at most 1. Guests see Choose 1. Add the three sizes to it.
- Create Add-on customizations for the toppings: Extra cheese $2.50, Pepperoni $2, Mushrooms $1.50.
- Create a rule Extra toppings: at least 0, at most 3. Guests see Choose up to 3. Add the toppings to it.
- On the pizza's card, click Manage Customizations, tick the sizes and the toppings, and click Save Changes.
Guests now pick exactly one size and up to three toppings, and the price adds up for them. To change a size price later, edit that one option, and every pizza using it changes.
The Categories tab
The Categories tab lists the categories you created (User Defined) first. The standard ones SSP provides (Predefined) are behind the Show built-in categories switch, which shows how many there are, such as Show built-in categories (24). Turn it on to list them after yours.
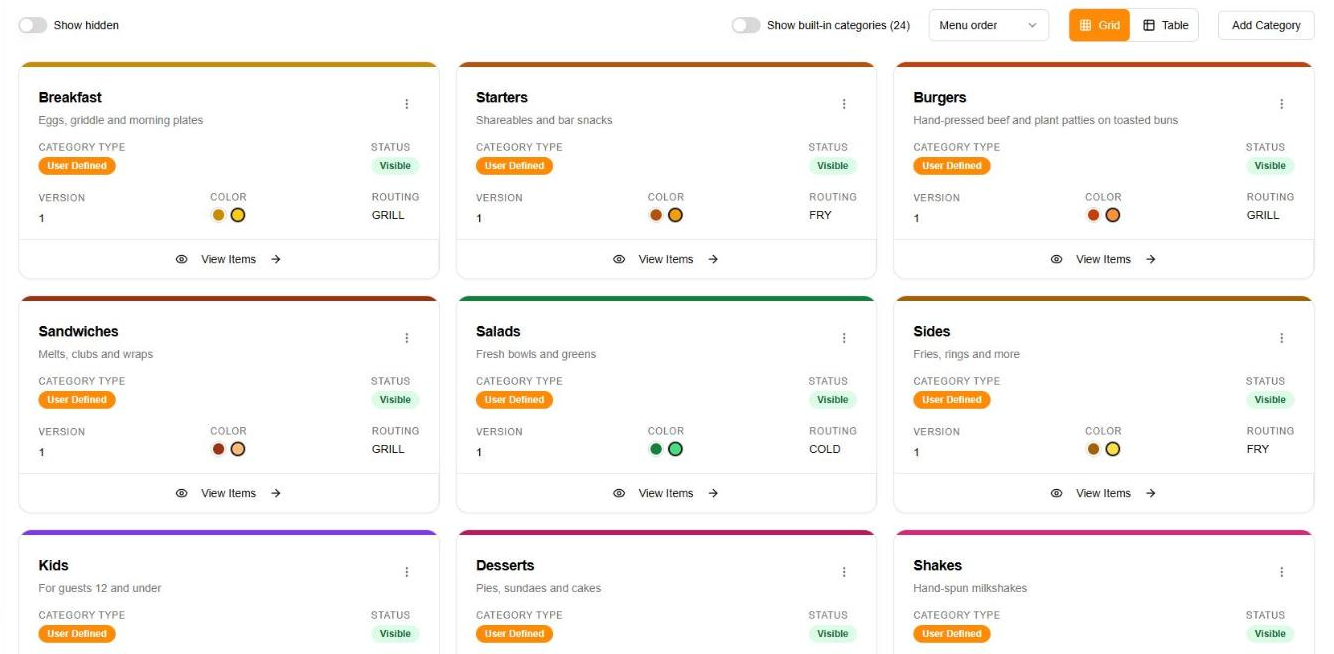
Each card shows its Category Type, its Status (Visible or Hidden), Version, Color and Routing. A Custom badge next to the routing means it was set for this location or group only. View Items at the bottom opens the category's items.
In Table view, the columns are ID, Name, Description, Type, Color, Routing, Visible, Version and Actions.
Adding a category
- On the Categories tab, click Add Category.
- Fill in Create Category:
- Name and Description (both required).
- Version (required): a number for your own records, such as 1.
- Active: on by default.
- Kitchen Routing: the class every item in this category inherits, or None (Unrouted).
- Light Mode Color and Dark Mode Color: the card color in each theme. Set both, or leave both empty.
- Click Create Category.
Then put items in it: edit each item and add the category under Categories.
Editing or deleting a category
For a category you created, open its ⋮ menu:
- Edit Category opens Update Category, with the same fields. Category Type can't be changed. Click Save Changes.
- Delete Category asks Delete this category? and can't be undone.
Predefined categories can't be edited or deleted. You can still hide them, change their card color and set their kitchen routing, as described below.
Sorting categories
The sort control next to Grid / Table has two choices:
- Menu order: the default. Categories appear in the same order as on the menu your staff use to take orders.
- Name A–Z: alphabetical, which is quicker when you're looking for one category among many.
Your choice is remembered, so the list opens the way you left it next time.
Hiding a category you don't use
Every location starts with the full set of predefined categories, and most restaurants only need some of them. You can hide the rest without deleting anything:
- Open the category's ⋮ menu (or use the eye button in Table view).
- Choose Hide category.
A hidden category disappears from this location's menu in SSP Manager and in the staff apps. Nothing else is touched: its items, color and routing are kept, and other locations are not affected. This works on predefined categories too.
Made a mistake? The confirmation that appears, Category hidden, has an Undo button.
Seeing hidden categories again. Hidden categories drop out of the list. The Show hidden switch counts how many there are, such as Show hidden (3), and turning it on brings them back into the list, dimmed and marked Hidden. To make one visible again, open its ⋮ menu and choose Unhide category.
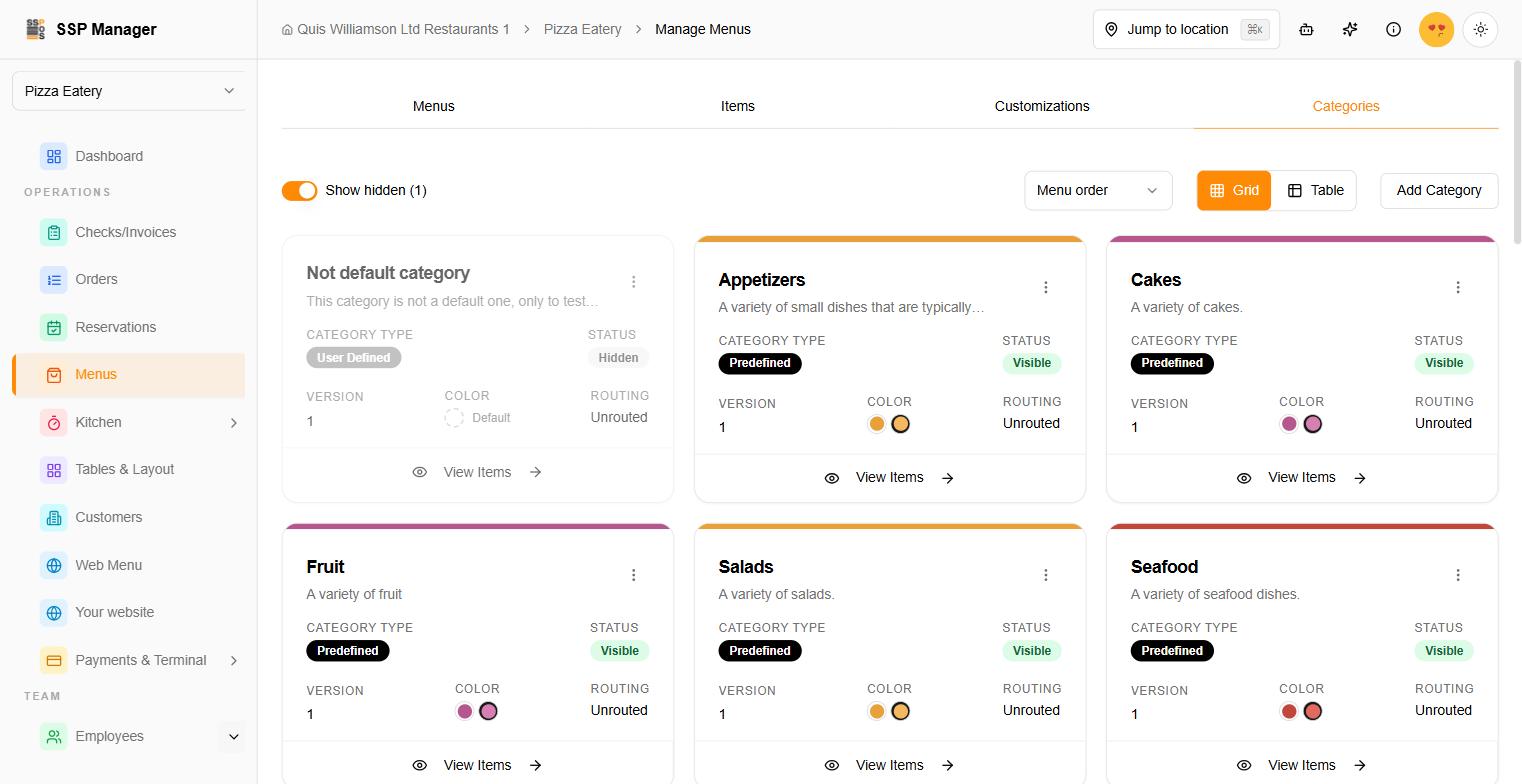
On the group's Categories tab, the same controls hide a category at every location in the group. A location can't unhide a category that the group has hidden. You'll see Still hidden — this category is inactive at a higher level. Unhide it on the group instead.
Hiding is not the same as the Active switch in Edit Category. Active changes the category itself. Hiding applies to one location or one group. Use Hide category to tidy up a single location's menu.
Who can hide categories. You need permission to update menu categories at that location, or to manage the group's categories. Without it, the Show hidden switch and the hide options don't appear.
Card color
⋮ → Card Color sets the category's color for this location only (or, on the group's page, for every location in the group). Pick a Light Mode Color and a Dark Mode Color, then save. Remove location color (or Remove chain color) goes back to the category's own color.
Kitchen routing for a category
⋮ → Kitchen Routing opens Kitchen Routing — [category].
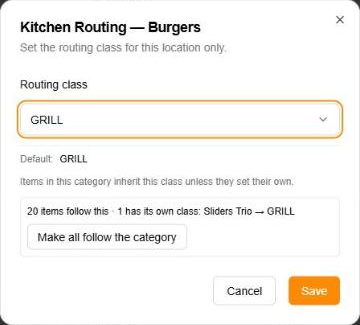
- Pick a Routing class.
- Click Save.
Under the drop-down, the dialog shows which items take their routing from this category: how many follow it, how many follow another of their categories, and which have a class of their own, such as 1 has its own class: Sliders Trio → GRILL.
Make all follow the category takes those items' own class away, so every item in the category is routed by it. You need permission to update menu items to use it.
On a location's page, this sets the routing for this location only. On the group's page, it sets it for every location in this chain. Default: shows the class the category falls back to. When you've set your own, a Custom badge appears, and Remove location routing (or Remove chain routing) takes it away again. If the group set the routing, change it from the group's page.
This is the only way to route a predefined category. For your own categories, you can also set Kitchen Routing in Edit Category; that setting applies everywhere the category is used.
Kitchen routing: where each item is cooked
Kitchen routing sends each item to the right kitchen station (and its printer). You create the routing classes, such as GRILL, FRY or BAR, once for your business. See Kitchen Routing.
You don't have to route every item. SSP Manager looks for a routing class in this order:
- The item. If the item has its own routing class, it uses it.
- Its category. If not, it uses its category's class. An item in several categories takes the first of them that has a routing class.
- The location default. If none of its categories has one, it uses the location's default class.
- Unrouted. If there is none at all, the item goes to the default station.
So the quickest way to route a whole menu is to route your categories, then give a class only to the few items that cook somewhere else.
Where to set each one:
- An item: Kitchen Routing in Edit, or the Routing column in Table view, where Follow category lets it follow its category. For many items at once, select them and use Kitchen routing in the batch bar.
- A category: ⋮ → Kitchen Routing, or Kitchen Routing in Edit Category.
- An option: Kitchen Routing on the customization. None sends it with its item.
- The location default: Kitchen → Stations & capacity → Routing.
Taxes on items and categories
On a location's Items tab, each card has a Tax Rules section. It lists every tax that applies to the item with its amount and rate, or Exempt from [tax] with where the exemption comes from (from category … or item rule). If none applies, it says No taxes apply to this item.
Category cards show their tax rules under Tax Information.
Tax rules are set on the location's Taxes page. Edit in Taxes on an item card, and Tax Rules at the bottom of a category card, take you straight to the right rules. You need permission to view taxes to see these links. See Managing Tax Rules.
Allergens and dietary info
Each item has an Allergens row (on its card, and as a column in Table view), and each customization has one too. They open the allergens sheet: the 13 priority allergens, dietary tags, spice level and calories. An item nobody has reviewed shows Allergens not set, never "allergen-free". See Allergens & Dietary Info.
Writing a good menu
Descriptions. Say what makes the dish special, in one or two sentences.
- Good: Hand-tossed pizza with San Marzano tomatoes, fresh mozzarella and basil, baked in our wood-fired oven.
- Too short: Pizza with cheese.
Mention how it's cooked (grilled, slow-roasted), the best ingredients, and words guests can almost taste (crispy, tender).
Names. Use the name a guest would say: Classic Margherita Pizza, Grilled Atlantic Salmon. Avoid codes like Pizza1 or Item_234 in the name. If your printed menu numbers its dishes, put that in Menu code instead. See Menu codes.
One item, many options. If a dish comes in sizes or with a choice of protein, make one item with customizations rather than several near-identical items. See the pizza example.
Troubleshooting
A menu isn't showing
- Check that Menu Enabled is on.
- Check the menu's schedule. Outside its times, the menu is not available.
- For your website, check Show on Website. The card tells you if something else is keeping the menu off your website.
- In a group, check whether it's a group menu. Change group menus from the group's Menus page.
An item is missing
- Check the item's Active and Available switches, and Show on Website for your website.
- Check that it is on the right menu: edit the item and look at Menus.
- In Table view, click Clear to remove any filters.
A photo won't upload
- Use an image file of 20 MB or less.
- Check your internet connection, then try again.
A price is wrong
- Check the item's base price, then the price of each customization chosen with it.
- Make sure you are on the right location. A group item's price is set on the group's Menus page.
Related
- Allergens & Dietary Info
- Kitchen Routing
- Kitchen Stations
- Tax Management
- Printer Management
- Orders
- Reports: see which items sell in the Item Sales report
Getting Help
Need assistance with your menu?
- 💬 Live Chat: Click the chat icon in your dashboard
- 📧 Email: support@ssppos.com
- 📚 Help Center: docs.ssppos.com