Menu Management
Complete guide to creating, organizing, and managing your restaurant menus in SSP Manager.
Your menu configuration directly impacts both waiter apps and guest ordering experiences. Items marked unavailable won't appear to guests. Menu schedules control when items can be ordered. Tax settings ensure correct pricing is displayed. Get these right to provide a seamless ordering experience.
Overview
SSP Manager provides powerful menu management tools that support:
- Multiple menus per location (Breakfast, Lunch, Dinner, Brunch, etc.)
- AI-powered menu import from photos
- Category organization (Appetizers, Entrees, Desserts, etc.)
- Rich item details with descriptions, images, and dietary flags
- Customization templates (add-ons and modifiers with price adjustments)
- Advanced menu scheduling (4 schedule types with priority levels)
- Dual availability controls (active status + availability status)
- Tax preview (see calculated taxes before ordering)
- Multi-location synchronization (Collections)
Accessing Menu Management
You must first navigate to a specific restaurant location to access Menu Management. If you signed up as a single restaurant, you'll land directly at your location. For restaurant groups/chains, select your location from the Group/Chain Dashboard first.
Navigation Path: [Your Location] → Menus
Step-by-Step Access
- Navigate to your restaurant location (if using a Group/Chain, select it from the dashboard)
- In the sidebar, click Menus under the Operations section
Required Permission: Manager role
Quick Start: Import Your Menu with AI
The Easiest Way to Get Started
SSP Manager can automatically import your entire menu from a photo! Just snap a picture of your existing menu and let AI do the work.
How It Works
- Navigate to Menus in your location
- In the Menus tab, click Add Menu From Image (marked as "Recommended")
- Upload a clear photo of your menu
- Wait for processing (usually 30 seconds to 2 minutes)
- Review the extracted menu and confirm
- Ensure good lighting - avoid shadows and glare
- Capture the entire menu section in one photo
- Make sure text is clear and readable
- Take multiple photos for multi-page menus
What Happens Next
SSP Manager's AI will automatically:
- ✅ Extract all menu items and their names
- ✅ Capture prices accurately
- ✅ Identify categories (Appetizers, Entrees, etc.)
- ✅ Read descriptions for each item
- ✅ Organize everything into a structured menu
Processing time: Usually 30 seconds to 2 minutes
Review and Confirm
After processing, you'll see a preview of your imported menu:
- Review Items: Check that all items were captured correctly
- Verify Prices: Ensure prices are accurate
- Adjust Categories: Move items between categories if needed
- Add Missing Details: Fill in any information AI couldn't read
- Click "Confirm Import"
Always review the imported menu carefully. While our AI is highly accurate, it's good practice to verify prices and descriptions before going live.
What If Something's Wrong?
- Missing Items: Click + Add Item to add them manually
- Wrong Price: Click on the item to edit the price
- Wrong Category: Drag and drop items to move them
- Unclear Description: Edit or add more detail
- Delete Duplicates: Select and delete any duplicate items
Example: Importing a Pizza Menu
Step 1: Take a photo of your pizza menu Step 2: AI processes and extracts:
- Margherita Pizza - $14.99
- Pepperoni Pizza - $16.99
- BBQ Chicken Pizza - $17.99
- Veggie Supreme - $15.99
Step 3: Review and confirm Step 4: Your menu is live!
Total time: Under 5 minutes ⚡
Menu Structure
Your menu is organized in a simple hierarchy:
Location
└── Menus
    ├── Lunch Menu
    │   ├── Appetizers (Category)
    │   │   ├── Garlic Bread - $6.99
    │   │   └── Mozzarella Sticks - $8.99
    │   ├── Entrees (Category)
    │   │   ├── Margherita Pizza - $14.99
    │   │   └── Pasta Alfredo - $16.99
    │   └── Desserts (Category)
    │       └── Tiramisu - $7.99
    └── Dinner Menu
        └── ...
Creating a Menu Manually
If you prefer to build your menu from scratch:
Step 1: Create a New Menu
- Navigate to Locations → [Location Name] → Menus
- Click + Create Menu
- Enter menu details:
- Name: "Lunch Menu", "Dinner Menu", etc.
- Description: Brief description (optional)
- Active Hours: When this menu is available
- Display Order: Order in which menus appear
- Click Save Menu
Step 2: Add Categories
Organize your menu with categories:
- Click into your new menu
- Click + Add Category
- Enter category information:
- Name: "Appetizers", "Entrees", "Desserts", etc.
- Description: Optional category description
- Display Order: Order categories appear
- Image: Upload a category photo (optional)
- Click Save Category
Repeat for all your categories.
Step 3: Add Menu Items
Now add items to each category:
- Click into a category
- Click + Add Item
- Fill in item details:
- Name: Item name
- Description: Appealing description
- Price: Base price
- Photos: Upload 1-5 high-quality images
- Available: Toggle on/off
- Featured: Highlight popular items
- Click Save Item
Working with Menu Items
Item Details
Each menu item supports extensive configuration options:
Core Information
- Name (required): Clear, descriptive name
- Description: Enticing description (1-2 sentences)
- Price: Base price for the item
- Preparation Time: Estimated cooking time in minutes (see below)
- Image: Primary item photo
The Preparation Time field directly affects the ordering experience:
- For Servers: Shows estimated time remaining for each order item
- For Guests: Displays expected wait time when ordering
- For Kitchen: Helps prioritize and sequence orders
Always set accurate prep times. A 5-minute salad and a 25-minute steak should have different values. This helps set correct expectations and improves kitchen coordination.
Availability Controls
- Active (
is_active): Whether item exists in menu - Available (
is_available): Whether item can be ordered now - Availability Description: Text like "Lunch only" or "Seasonal"
Dietary Flags
Toggle these to help guests with dietary restrictions:
- Vegetarian: No meat
- Vegan: No animal products
- Gluten-Free: No gluten-containing ingredients
- Halal: Halal-certified
- Kosher: Kosher-certified
- Organic: Organic ingredients
- Spicy: Contains spicy ingredients
Allergen & Ingredient Information
- Allergens: List allergens (dairy, nuts, shellfish, etc.)
- Ingredients: Full ingredient list
- Nutritional Information: Calories, macros, etc.
Engagement & Highlighting
- Popular: Mark as a popular item (shows badge)
- Recommended: Staff-recommended item
- New: Recently added item (shows "New" badge)
- Tags: Custom tags for filtering/searching
Advanced Fields
- Kitchen Routing: The routing class that sends this item to the right kitchen station (and printer). Set it here, or tag the whole category — see Kitchen Routing
- Special Instructions: Default prep instructions for kitchen
- Video URL: Link to preparation video
- Loyalty Points: Points earned when ordering
- SEO Title/Description: For online ordering pages
Multi-Menu Assignment
Items can belong to multiple menus and categories:
- Assign item to multiple
menu_ids - Assign item to multiple
category_ids - Same item appears in Lunch and Dinner menus
Adding Item Photos
Great photos sell more food! Here's how to add them:
- Click on a menu item
- Click Upload Photos
- Choose your photos:
- From your computer
- From your phone
- From cloud storage
- Adjust and crop as needed
- Click Save
- Use natural lighting
- Show the actual portion size
- Include garnishes and presentation
- Avoid filters - show real colors
- Use a neutral background
Customization Templates
Customization templates define what options guests see when ordering. These appear in both the waiter app and guest ordering interfaces, allowing customers to customize their orders.
Customization Templates are reusable options that can be attached to menu items. They let customers modify their orders with add-ons and variations.
Two Types of Templates
Add-ons (ADDON)
Additional items that can be added to an order, typically with an extra charge.
Examples:
- Extra cheese (+$1.50)
- Add bacon (+$2.00)
- Side of ranch (+$0.50)
- Extra shot of espresso (+$1.00)
Modifiers (MODIFIER)
Variations or choices for how an item is prepared, may or may not have a price adjustment.
Examples:
- Size: Small / Medium / Large
- Temperature: Rare / Medium / Well-done
- Bread choice: White / Wheat / Sourdough
- Milk type: Whole / Skim / Oat / Almond
Creating a Customization Template
- Navigate to Menus → Customizations tab
- Click + Create Template
- Enter template details:
- Name: Descriptive name (e.g., "Extra Toppings", "Size Options")
- Type: Choose
ADDONorMODIFIER - Price Adjustment: Enter amount (e.g., $1.50 for add-ons)
- Active: Toggle on/off
- Click Save
Attaching Templates to Items
Once created, templates can be attached to one or multiple menu items.
Single Item Attachment
- Select a menu item
- Go to the Customizations section
- Click Attach Template
- Select the template(s) to attach
- Save changes
Bulk Attachment
Attach the same template to multiple items at once:
- In the Customizations tab, find your template
- Click the menu (⋮) and select Bulk Attach
- Select multiple menu items
- Click Attach to Selected
Managing Templates
View Template Usage
Each template shows how many menu items it's attached to (menuItemsCount). This helps you understand the impact of changes.
Edit Templates
- Find the template in the Customizations tab
- Click to edit
- Changes apply to all attached items
Detach Templates
Remove a template from items:
- Single item: Edit the item and remove the template
- Bulk detach: Select multiple items and detach the template from all
Filtering Templates
Filter your templates to find what you need:
- By Type: Show only Add-ons or only Modifiers
- By Status: Show only active or inactive templates
Example: Pizza Customizations
Size Modifier Template:
- Type: MODIFIER
- Options attached to all pizzas:
- Small (10") - Base price
- Medium (12") - +$3.00
- Large (14") - +$5.00
Extra Toppings Add-on Templates:
- Type: ADDON
- Individual templates for each topping:
- Extra Cheese - +$2.50
- Pepperoni - +$2.00
- Mushrooms - +$1.50
- Extra Sauce - +$0.50
Example: Coffee Customizations
Size Modifier:
- Type: MODIFIER
- Small / Medium / Large
Milk Options Modifier:
- Type: MODIFIER
- Whole Milk (default)
- Skim Milk
- Oat Milk (+$0.75)
- Almond Milk (+$0.75)
Add-ons:
- Type: ADDON
- Extra Shot (+$1.00)
- Whipped Cream (+$0.50)
- Flavor Syrup (+$0.75)
Menu Scheduling
Menu schedules determine when items appear in the waiter app and guest ordering. If a menu is outside its scheduled time, its items won't be available for ordering.
SSP Manager supports four schedule types for menus, giving you precise control over when menus are active.
Schedule Types
1. Always Active
Menu is available 24/7, every day.
Best for: Your main menu that should always be available.
2. Recurring Schedule
Menu is available on specific days of the week with daily time windows.
Best for: Breakfast, Lunch, Dinner, Happy Hour, Weekend Brunch menus.
Configuration:
- Select which days the menu is active (e.g., Monday-Friday)
- Set start and end times for each active day
- The menu automatically activates/deactivates based on the schedule
Example - Lunch Menu:
- Days: Monday through Friday
- Time: 11:00 AM - 3:00 PM
- Menu automatically shows at 11 AM and hides at 3 PM
3. Date Range Schedule
Menu is available between specific start and end dates with optional time windows.
Best for: Seasonal menus, holiday specials, limited-time promotions.
Configuration:
- Set start date and end date
- Optionally set daily time windows within that range
- Menu automatically activates on start date and deactivates on end date
Example - Summer Menu:
- Start Date: June 1, 2025
- End Date: August 31, 2025
- Time: All day
- Menu appears on June 1 and disappears after August 31
4. Manual Control
Menu is controlled manually - you turn it on and off yourself.
Best for: Special events, catering menus, or menus you want full control over.
Schedule Priority
When multiple menus are active simultaneously, priority determines which one takes precedence:
- Higher priority number = higher precedence
- Use priority when menus might overlap (e.g., Happy Hour overlapping with Dinner)
Example:
- Dinner Menu: Priority 1 (default)
- Happy Hour Menu: Priority 10 (takes precedence during Happy Hour times)
Special Dates
Add exceptions to your regular schedule:
- Override specific dates: Make a menu available on a day it's normally not
- Block specific dates: Make a menu unavailable on a holiday or special event
Schedule Preview
Use the 7-day preview to see when your menus will be active:
- Open menu scheduling
- View the calendar preview showing active times for the next 7 days
- Verify your schedule is correct before saving
Timezone Support
Each menu schedule respects the location's timezone setting. If you have locations in different time zones, menus will activate at the correct local time for each location.
Item Availability Controls
Each menu item has two independent availability controls. Understanding these is crucial for proper menu management.
Active Status (is_active)
Controls whether the item exists in your menu system.
- Active (ON): Item is part of your menu, visible in management
- Inactive (OFF): Item is hidden from all systems, essentially archived
Use this when: You want to completely remove an item from service (discontinued, seasonal item out of season).
Availability Status (is_available)
Controls whether the item can currently be ordered.
- Available (ON): Item can be ordered by guests and waiters
- Unavailable (OFF): Item shows as "Currently Unavailable" - visible but not orderable
Use this when: You're temporarily out of an ingredient, or the kitchen can't prepare the item right now.
How They Work Together
| Active | Available | Result |
|---|---|---|
| ON | ON | Item visible and orderable |
| ON | OFF | Item visible but shows "Unavailable" |
| OFF | - | Item hidden from all ordering interfaces |
Quick Availability Toggle
From the menu items list, you can quickly toggle availability:
- Find the item in your menu
- Click the availability toggle (power icon)
- Item immediately becomes available/unavailable
This is perfect for 86'ing items during service.
86 from the kitchen screen
The kitchen can also 86 a dish it has run out of, straight from the KDS item sheet, without opening SSP Manager. It flips the same Availability switch: the dish disappears from the waiter's picker and shows as sold out on the web menu. The KDS cannot put it back; use the toggle above.
The control appears only for accounts holding the eighty_six_menu_items ability — see Roles & Permissions. See also Working a Ticket → 86 a dish.
A dish shared by every location of a chain (a collection item) has one availability switch. An 86 from any kitchen applies to every location.
The KDS control ships with backend release LRSSPBackend #1782. Until it is deployed, availability is changed from SSP Manager only.
Item Variations (via Customization Templates)
SSP Manager handles item variations through Customization Templates. Instead of creating separate menu items for each size or protein choice, you create one item and attach modifier templates.
When to Use Variations
Use Customization Templates when the same dish comes in different versions:
- Size options (Small, Medium, Large)
- Protein choices (Chicken, Beef, Shrimp, Tofu)
- Pasta types (Spaghetti, Fettuccine, Penne)
- Bread options (White, Wheat, Sourdough)
Setting Up Variations
Instead of creating separate items, create one item with a Modifier template:
Example: Sandwich with Protein Options
- Create menu item: "Grilled Sandwich" at base price $11.99
- Create Modifier template: "Protein Choice"
- Type: MODIFIER
- Options:
- Chicken (default, +$0.00)
- Beef (+$3.00)
- Shrimp (+$4.00)
- Tofu (-$1.00)
- Attach the template to the sandwich item
Result: Guests select their protein when ordering. Final price adjusts automatically.
Why This Approach?
- One item to manage instead of 4 separate items
- Consistent pricing - change the base price once
- Reusable templates - attach the same protein options to multiple items
- Cleaner menu - guests see one item with options, not 4 similar items
Item Tax Rules and Tax Preview
Tax rules on menu items ensure guests see accurate pricing. The tax preview shows exactly what taxes will be applied before an order is placed.
Tax Preview
Each menu item includes a Tax Preview that shows:
- Total tax amount for the item
- Tax components breakdown (each tax name, rate, and amount)
- Whether any taxes are exempt
This helps you verify tax configuration is correct before items go live.
Assigning Tax Rules to Items
You can assign specific tax rules at the item level or category level:
- Select a menu item
- Go to the Tax Rules section
- Click + Add Tax Rule
- Configure:
- Tax: Select which tax to apply
- Exempt: Check if item should be exempt from this tax
- Priority: Set priority for rule precedence
- Date Range (optional): Set start/end dates for the rule
- Save the rule
Category-Level Tax Rules
Apply tax rules to entire categories:
- Go to Categories tab
- Select a category
- Add tax rules that apply to all items in that category
Items inherit category tax rules unless overridden at the item level.
Tax Rule Priority
When multiple tax rules could apply:
- Higher priority rules take precedence
- Item-level rules override category-level rules
- Use priorities to handle special cases (e.g., Happy Hour tax-exempt items)
Common Tax Scenarios
Alcohol Tax:
- Create a higher tax rate for alcohol
- Apply to "Beverages - Alcohol" category
- Non-alcoholic items use standard rate
Tax-Exempt Items:
- Some items may be tax-exempt (e.g., certain food items in some jurisdictions)
- Mark specific items as exempt
- They'll show $0.00 tax in preview
Multiple Tax Rates:
- Some locations have state + city + county taxes
- Each appears as a separate component in tax preview
- Total shows combined tax amount
Multi-Location Menu Management
Collections: Sync Menus Across Locations
If you have multiple locations, use Collections to manage menus centrally:
Create a Collection Menu
- Navigate to Collections → [Your Collection]
- Click Menus
- Create menu at collection level
- All locations in the collection instantly get this menu
Location Overrides
Individual locations can override prices or availability:
- Go to Locations → [Specific Location] → Menus
- Click on a collection menu item
- Click Override for This Location
- Change what you need:
- Different price
- Different availability
- Hide item entirely
- Click Save Override
Example: Your downtown location charges $1 more due to higher rent.
Menu Categories
Best Practice Categories
Common restaurant categories:
Full-Service Restaurant:
- Appetizers
- Soups & Salads
- Entrees
- Sides
- Desserts
- Beverages
- Kids Menu
Café:
- Coffee & Espresso
- Tea
- Breakfast
- Lunch
- Bakery
- Smoothies & Juices
Pizza Restaurant:
- Appetizers
- Salads
- Pizzas
- Calzones & Stromboli
- Pasta
- Desserts
- Beverages
The Categories tab
Open Menus from the sidebar and choose the Categories tab to see every category this location can use: the ones you created (User Defined) and the standard ones SSP provides (Predefined). Each category shows whether it is Visible or Hidden here, its colour, and its kitchen routing. Grid and Table switch between cards and a compact list.
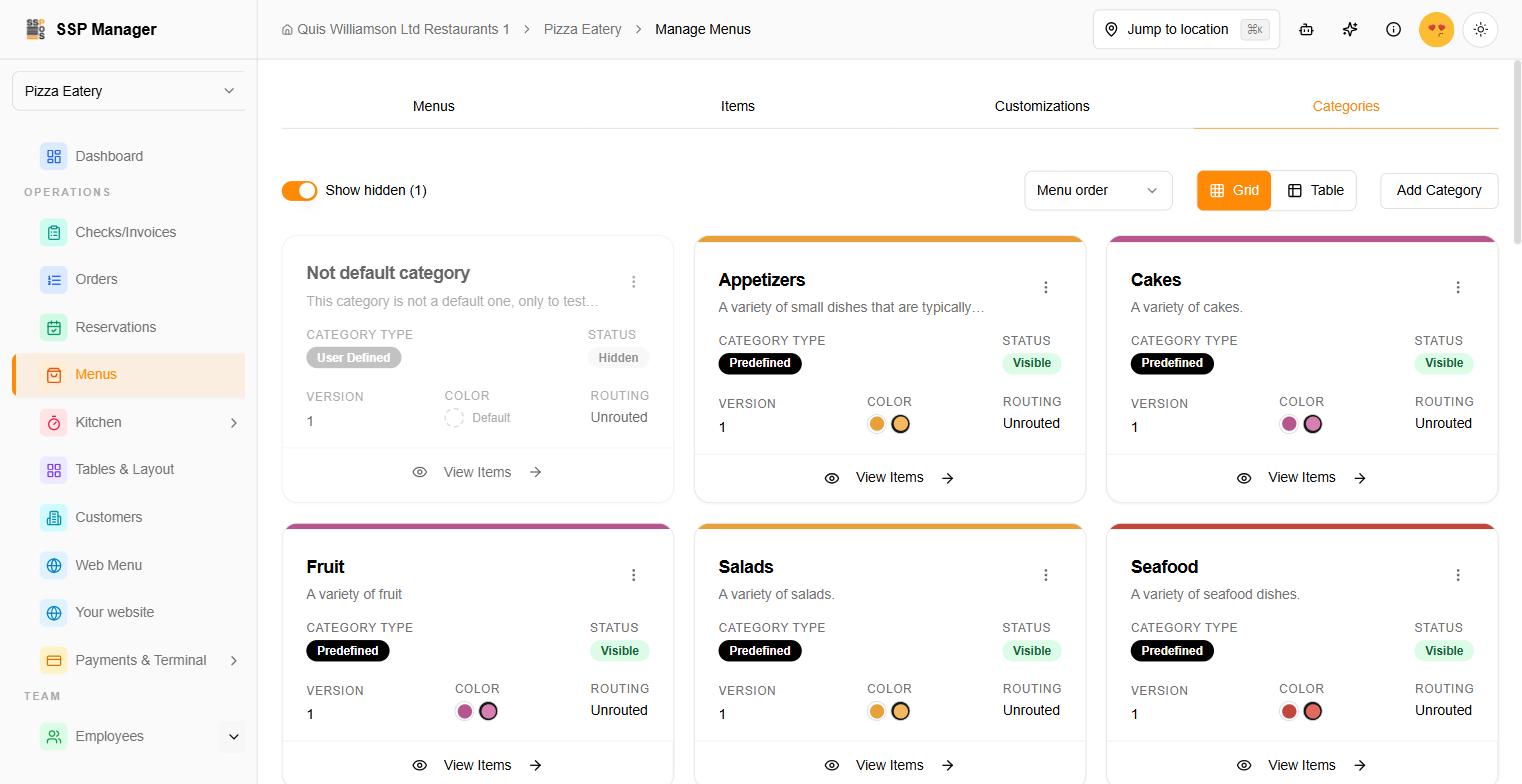
Sorting categories
The sort control next to Grid / Table has two choices:
- Menu order — the default. Categories appear in the same order as they do on the menu your staff use to take orders.
- Name A–Z — alphabetical, which is quicker when you're looking for one category among many.
Your choice is remembered, so the list opens the way you left it next time.
Hiding a category you don't use
Every location starts with the full set of predefined categories, and most restaurants only need some of them. You can hide the rest without deleting anything:
- Open the category's ⋮ menu (or use the eye button in Table view).
- Choose Hide category.
A hidden category disappears from this location's menu in SSP Manager and in the staff apps. Nothing else is touched: its items, colour and routing are kept, and other locations are not affected. This works on predefined categories too.
Made a mistake? The confirmation that appears — Category hidden — has an Undo button.
Seeing hidden categories again. Hidden categories drop out of the list. The Show hidden switch counts how many there are — Show hidden (3) — and turning it on brings them back into the list, dimmed and marked Hidden. To make one visible again, open its ⋮ menu and choose Unhide category.
If your locations are grouped into a chain, the chain's Categories page has the same controls, and hiding a category there hides it at every location in the chain. A location can't unhide a category that the chain has hidden — you'll see Still hidden — this category is inactive at a higher level. Unhide it on the chain instead.
Hiding is not the same as the Active switch in Edit Category. Active changes the category itself, and hiding applies to one location or chain. Use Hide category to tidy up a single location's menu.
Who can hide categories. You need permission to update menu categories at that location, or to manage the chain's categories. Without it, the Show hidden switch and the hide options don't appear.
Menu Analytics
Track which items are performing well:
View Item Performance
- Go to Menus → [Your Menu]
- Click Analytics tab
- View metrics:
- Total Orders: How many times ordered
- Revenue: Total revenue generated
- Average Rating: Customer ratings
- Popular Times: When most ordered
- Profit Margin: Profitability
Optimize Your Menu
Use analytics to:
- Promote Top Sellers: Feature them on your menu
- Adjust Pricing: Optimize based on demand
- Remove Poor Performers: Free up menu space
- Create Combos: Bundle popular items
Pricing Strategies
Standard Pricing
Set one price for all times and days.
Happy Hour Pricing
Create time-based discounts:
- Click on menu item or category
- Go to Pricing section
- Click + Add Price Rule
- Configure:
- Name: "Happy Hour"
- Discount: 20% off or $2 off
- Days: Monday-Friday
- Hours: 3:00 PM - 6:00 PM
- Click Save
Combo Meals
Create meal deals:
- Navigate to Menus → Combos
- Click + Create Combo
- Name your combo: "Lunch Special"
- Add items to combo:
- Sandwich (customer chooses)
- Side (customer chooses)
- Drink (customer chooses)
- Set combo price: $12.99 (normally $15.99)
- Show savings: "Save $3.00!"
Menu Best Practices
Writing Great Descriptions
✅ Good Description: "Hand-tossed pizza with San Marzano tomatoes, fresh buffalo mozzarella, and garden basil, drizzled with extra virgin olive oil and baked in our wood-fired oven"
❌ Poor Description: "Pizza with cheese"
Tips for Descriptions:
- Use sensory words (crispy, tender, savory)
- Mention cooking methods (grilled, wood-fired, slow-roasted)
- Highlight premium ingredients
- Keep it to 1-2 sentences
- Focus on what makes it special
Item Naming
✅ Good Names:
- Classic Margherita Pizza
- Grilled Atlantic Salmon
- Homemade Apple Pie
❌ Avoid:
- Pizza1
- Item_234
- sandwich
Pricing Psychology
- Use $9.99 instead of $10.00
- Don't use dollar signs ($) in printed menus
- Group similar price points together
- Highlight value with combo meals
Bulk Operations
Update Multiple Items at Once
- Go to Menus → Bulk Edit
- Select items to update
- Choose action:
- Update Prices: Increase/decrease by % or amount
- Change Availability: Turn on/off for all
- Update Category: Move to different category
- Apply Tags: Add dietary/allergen tags
- Click Apply Changes
Export/Import Menus
Export Menu:
- Click Menus → Export
- Select format (CSV or Excel)
- Download file
Import Menu:
- Click Menus → Import
- Upload CSV or Excel file
- Map columns
- Review and confirm
Troubleshooting
Menu Not Showing
- Check if menu is set to "Active"
- Verify availability schedule
- Ensure location has access to menu
- Clear browser cache and refresh
Items Missing
- Check item availability settings
- Verify item is in the correct category
- Ensure menu is published
- Check if item was accidentally deleted (check trash)
Photos Not Uploading
- Check file size (max 5MB per image)
- Use supported formats (JPG, PNG, WebP)
- Ensure stable internet connection
- Try a different browser
Wrong Prices Showing
- Verify no price overrides are set
- Check for active promotional pricing
- Ensure correct location selected
- Review recent price changes
Mobile Menu Management
Access your menu from anywhere:
- From Phone: Full menu editing on mobile browser
- Quick Updates: Change prices and availability on-the-go
- Photo Upload: Take and upload photos directly from phone
- Voice Input: Use voice-to-text for descriptions
Next Steps
Getting Help
Need assistance with your menu?
- 💬 Live Chat: Click the chat icon in your dashboard
- 📧 Email: support@ssppos.com
- 🎥 Video Tutorials: Watch menu setup videos
- 📚 Help Center: docs.ssppos.com
Your menu is the heart of your business. SSP Manager makes it easy to keep it fresh, accurate, and profitable! 🍽️