Setting Up Your Restaurant in SSP Manager
Welcome! This guide walks you through onboarding — the short, guided setup that gets your restaurant ready to take orders. Most owners finish in about 15 minutes, less if you delegate a couple of steps to your manager.
If you'd rather have your manager fill in the menu and floor plan while you handle the rest, SSP Manager can split the work between you. We'll show you how.
What you'll do
Onboarding has eight short screens, grouped into three stages.
| Stage | What you set up |
|---|---|
| Start | Your restaurant name, contact info, plan choice, and address |
| Configure | Menu, table layout, staff invites, and tax rates |
| Launch | Payment processing, then you're live |
You can skip optional steps and come back later. Required steps are clearly marked.
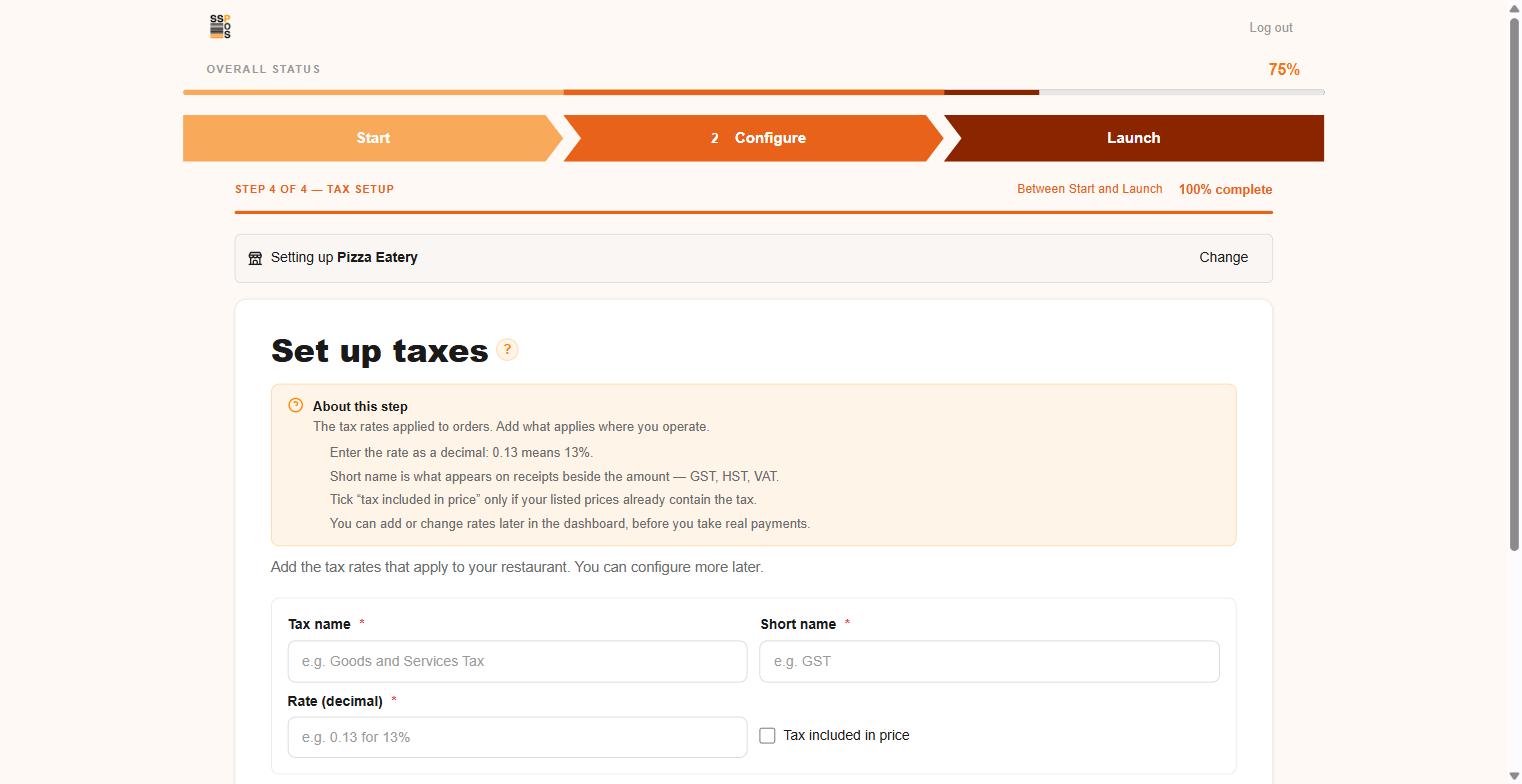
Reading the progress header
The top of every screen tells you where you are, at two levels:
- Overall status — one bar across all eight steps, so each finished step moves it on by an eighth. Payment setup is the one exception: it doesn't count until a processor is connected or you skip the step.
- The three stages — Start, Configure and Launch, each in its own colour. The stage you're in carries its number; the line beneath it names the step (Step 4 of 4 — Tax setup) and fills in that stage's colour as you go.
Help on every step
Every step has a ? next to its title. Click it for a short About this step note: what the step is for, and the few things worth knowing before you fill it in — that your address decides your tax, currency and time zone, for example, or that a tax rate is entered as a decimal. The note opens above the form, so the fields it explains stay in view. Click ? again, or press Esc, to close it.
The fastest setup is: fill in restaurant details, address, skip optional steps, then connect your payment processor when you're ready. You can refine menus and floor plans anytime after launch.
The flow at a glance
Two paths through the flow:
- Owner path (top of the diagram): you create the org, set up the address, then optionally delegate menu/tables/staff to a manager before finishing up with taxes and payment.
- Delegatee path (the right-hand fork from "Pending invitations"): you were invited to handle one task. After accepting, you land directly on that screen — not on the owner's Stage 1. When you finish, you see a Thanks — your part is done screen (the dotted lines at the bottom of Stage 2). You don't continue through Launch; the owner does that.
The two delegation gates (purple, dashed) are optional. If the owner says no, I'll do it myself, they go through the regular screens. If yes, the manager gets an email invitation and the owner skips ahead.
Before you start
You'll need:
- An account. If you don't have one, create one first. Email/password, Google, and Apple sign-in all work.
- Your restaurant's basics. Legal business name, phone number, address.
- A rough sense of your plan. You'll pick one during setup — you can change later.
- Optional: a manager you trust. If you want help, have their email handy.
If you already have more than one restaurant
Most people going through onboarding are setting up their first restaurant, and this section won't apply — skip ahead.
If your organisation already has two or more restaurants and you re-enter onboarding, SSP Manager stops and asks before showing you anything:
Which restaurant are you setting up?
Pick the one you mean. These steps overwrite that restaurant's existing settings.
Choose from the dropdown and click Continue. Nothing is filled in and nothing is saved until you answer, because these screens overwrite the restaurant you pick — its name, address, tax, tables and payment setup.
From then on, every step carries a reminder at the top:
🏪 Setting up Riverside Grill — Change
Use Change if you picked the wrong one. The choice lasts for the current browser tab, so you're asked once rather than on all eight screens, and it's forgotten when you close the tab.
Stage 1 — Start
Restaurant details
The first screen is the most important. You'll enter:
- Restaurant name — what your customers know you by. Shown on receipts and in the staff app.
- Legal business name — the official name on your business registration. Often the same as your restaurant name.
- Phone number (optional).
- Logo (optional) — PNG, JPG, or SVG. Square logos look best (max 2 MB).
- Chain or group name (optional) — fill this in only if you operate multiple restaurants under one brand. If you're a single-location restaurant, leave it blank.
- Plan — Starter, Growth, Business, or Enterprise. Every plan except Enterprise starts with a 30-day free trial, and no credit card is needed to begin. Enterprise is priced for each organisation, so it can't be picked for a trial: choosing it tells you how to reach our sales team at sales@ssppos.com instead.
A chain (or group) lets you manage multiple restaurants together — shared menus, unified reporting, cross-location staff. You can also add a chain later from settings; you don't have to decide now.
If you do create one here, you can rename it anytime on this screen. To remove a chain, click the Remove chain link that appears under the field after you've created one. Doing this won't delete your restaurant — only the chain grouping.
Click Continue when you're done.
Address details
Enter your restaurant's address. SSP Manager uses this to:
- Set your tax jurisdiction
- Show customers the right currency and time zone
- Verify your business with payment processors later
We'll auto-detect your currency and time zone based on the country you pick. You can override them if needed.
Click Continue to move on.
Between Start and Configure — the menu delegation question
After your address is saved, you'll see a quick question screen:
Save time — delegate the essentials?
Have your manager handle the data-entry pieces. Pick one, both, or neither — you can always do them yourself later.
You can hand off Menu setup and Table layout to a manager. Helpful if you'd rather not type in every menu item and floor plan detail yourself.
Three options:
- Delegate both — pick Menu and Table layout, enter your manager's email, choose their role, and click Send invitation. They'll get one email per item. You skip ahead to staff setup.
- Delegate one — same as above, but only check the one you want help with. You'll do the other one yourself on the next screen.
- No, I'll do it myself — click the button and go straight into menu setup.
If you delegate both menu and table layout to the same manager, they receive one invitation per item. They'll need to accept each one. This is intentional — accepting one task doesn't auto-assign the other.
The dropdown only lists roles that can actually do the job, for the steps you ticked. On a single-restaurant account that's Organization admin, Manager, and Floor manager; Chain manager appears only once you've added a chain. The list is built and enforced by the system, so you can't pick a role that would leave your manager unable to finish the task.
Before you send, the screen tells you exactly what will happen — "1 item selected · 1 email will be sent".
Stage 2 — Configure
Menu setup
Add at least one menu item so your staff can start taking orders.
You can:
- Type items one at a time — name, price, category. Quick for a small menu.
- Import from photo — upload one or more photos of your printed menu (PNG or JPG). We'll extract the items for you to review and approve before anything is saved.
- Skip for now — you can build your menu later from the Menus section of the dashboard. (If you're skipping because you delegated this step, the screen won't show up at all.)
You'll see a Completing on behalf of… banner at the top if you're a delegated manager doing this for an owner.
Table layout
Define your floor plan so staff can assign orders to tables.
- Name your first floor (default: Main Floor) — most restaurants just have one.
- Add tables — give each one a label (Table 1, Patio 2, Bar 3) and seat count.
You can add more floors later from the Tables section. If you don't take dine-in orders, skip this step.
Staff setup
This screen has its own delegation gate before the form opens.
Delegate staff setup?
Let a manager handle inviting your team — or do it yourself now.
If you pick Have a manager invite the team, fill in their email + role and send the invitation. You'll skip directly to tax setup.
If you pick I'll invite my team myself, you'll see two ways to add staff:
- Invite by email — type each person's email address, pick their role, and they'll get an email with a sign-up link.
- Share a link — generate a shareable link and a join code for staff without a work email. You can hand it over three ways: copy a ready-made message to send via WhatsApp or SMS, point them at the app, or let them scan a QR code on your screen. The QR code opens the same link, and your restaurant's join code is printed beside it — staff are asked for it after the link opens, so leave it on screen until they've typed it in. The join code is also shown when you create the organisation and stays available whenever you need it.
You can mix both approaches. Invite a couple of managers by email, then share the link for everyone else later.
Start with just one or two managers during onboarding. Add the rest later from the Team section of your dashboard — there's no rush.
Tax setup
Add the tax rates that apply to your restaurant. You enter these yourself — the screen starts empty.
For each rate, fill in:
- Tax name — the full name, e.g. Harmonized Sales Tax.
- Short name — the abbreviation shown on receipts, e.g. HST.
- Rate (decimal) — enter
0.13for 13%, not13. - Tax included in price — tick this if your menu prices already include the tax.
Click Add tax to save each one. You'll see it confirmed above the form (Harmonized Sales Tax (13.0%) added), and a running count at the bottom. Add as many as you need — for example, one rate for food and another for alcohol — then click Continue.
Skip for now is also fine; you can configure rates later from Tax management in the dashboard.
Stage 3 — Launch
Payment setup
Connect a payment processor so you can accept credit cards.
You'll see one of two options depending on your country and plan:
- Stripe — works in most countries. Click Connect with Stripe, you'll be sent to Stripe to verify your business (legal name, tax ID, bank account, ID). Approval typically takes 1–2 business days.
- Clover — best if you're already running Clover POS hardware. Click Connect Clover and follow their sign-in flow. Clover is included on some plans and not others; if your plan doesn't cover it the card is shown but greyed out.
You can also skip this step if:
- You want to test SSP Manager first before processing real payments.
- You're cash-only.
- You'd rather configure payment later from settings.
Connecting Stripe immediately is the fastest path because approval takes a couple of days. You can keep using SSP Manager in test mode and train your staff while it's pending — only real card payments are blocked.
Ready to launch
The final screen — You're almost there! — shows a Setup summary: every step with its current status.
| Status | What it means | Link next to it |
|---|---|---|
| Completed | Finished and saved | Edit |
| Skipped | You chose to skip it | Edit |
| In progress | You started it but haven't finished | Fix now |
| With your team | You handed it to someone. The panel above the summary says who, and whether they've finished | (none — see below) |
Above the summary you'll see a reminder of the plan you picked and that your 30-day trial is active.
Steps handed to your team
If you delegated any steps, a Handed to your team panel sits above the summary with one row per step. Each row tells you:
- Who has it — their email address and the role you gave them.
- Where it stands — Waiting to accept, In progress, Finished, or Invitation expired — not started.
- What's holding it up, while the invitation is still unanswered:
- No account yet means they need to sign up before they can accept. Has an account means they only need to sign in.
- A countdown — Invite expires in 2 days, Invite expires in 6h — or Invite expired yesterday once it has lapsed. An expired invitation is shown in red.
Each row offers the actions that make sense for where it stands:
| Action | Shown when | What it does |
|---|---|---|
| Resend invite | They haven't accepted yet | Emails the invitation again. The step stays with them. |
| Take it back | The step isn't finished, whether or not they accepted | Returns the step to you and cancels their invitation, so the link in their email stops working. You can then do the step yourself, skip it, or delegate it again. |
Use Resend invite when a hand-off is just slow, and Take it back when it's going nowhere — for example, if they never answered, or accepted and then went quiet.
A step you've handed off has no Edit or Fix now link in the summary, even once it's finished — it's theirs, and that keeps two people from editing the same setup at once. If you want to do an unfinished step yourself, take it back first.
When you're ready, click Launch my restaurant →.
Launch is only allowed once every step is either Completed or Skipped. If something is still In progress, you'll be told which ones — for example "Finish Menu setup and Staff setup before launching." Use Fix now on those rows, then launch again.
Once you've launched, this same screen becomes Your restaurant is live., and the button changes to Go to my restaurant →.
If you're a manager being delegated to
If an owner has invited you to handle menu, table layout, or staff setup, here's what to expect.
You'll receive an email
The subject reads "A colleague delegated [step name] to you" — for example "A colleague delegated Menu Setup to you". It explains what the task involves and carries a button, Accept & Start [step name].
The button takes you to the SSP Manager sign-up page with your invitation already attached. Create your account (or sign in, if you already have one under that email) and you'll land on the task you were invited to do.
The email names the organisation you're being invited to, and the task you've been asked to handle. Invitations expire two days after they're sent, so open it reasonably promptly.
One task per invitation
If the owner delegated both menu and table layout to you, you'll get two separate emails. Click each one in turn — accepting one doesn't auto-accept the other.
If you sign in and you have more than one pending invitation, you'll see a list. Pick one to accept; the others stay in the list until you handle them.
What the screen looks like
You'll see a focused single-step view, not the full owner wizard. At the top there's a banner that reads:
Completing on behalf of [Owner's Name]
You only see the screens for the tasks you were delegated. When you finish, you'll see a Thanks — your part is done screen. The owner is notified automatically.
What if you're invited but already have a different account?
The invitation is tied to a specific email address. If you sign in with a different account, you'll see a Wrong account message with the option to sign out and sign back in with the right one.
What if the invitation expired or was taken back?
You'll see an Invitation no longer valid message. This also happens if the owner took the step back to do it themselves. Contact the owner if you think you should still have it — they can delegate it to you again.
Stopping and resuming
You don't have to finish onboarding in one sitting.
- Close the tab — when you sign back in, you'll resume on the screen where you left off.
- Switch devices — sign in on any browser; you'll land on the same step.
- Go back to an earlier screen — use the ← Back button at the bottom of most screens. We'll restore what you'd typed.
If you go back, your filled-in values are preserved. Going back to Restaurant details won't erase the menu items you'd typed two screens later.
Re-opening onboarding after launch
Once you've launched, you can still revisit the onboarding wizard anytime — to review what you set up, finish a step you skipped, or reopen one to make changes.
How to get there: click your avatar (top-right corner of any dashboard page) and choose Onboarding Setup from the dropdown.
You'll land on the Ready to launch screen, which now doubles as a summary view. You'll see:
- Completed steps with a green check.
- Skipped steps in grey.
- In progress steps in orange.
- With your team for any step you handed to someone. The Handed to your team panel above the summary shows who has each one and how far they've got — see Steps handed to your team.
Completed and skipped steps have an Edit link; unfinished ones have Fix now. Either one re-enters the wizard at that screen. When you open a step you've already finished, a banner confirms it — "You're editing a completed step. Your existing details are filled in below. Saving updates them — it won't create duplicates." The rest of your onboarding state is untouched.
Only users with the Organization admin or Chain manager role see Onboarding Setup in their avatar menu. Other staff (managers, wait staff, kitchen, etc.) don't see it — onboarding is meant for the people who own the org-level setup decisions.
- You skipped Tax setup during onboarding and now want to configure rates properly.
- You skipped Payment setup and your Stripe/Clover approval has come through.
- You want to add more menu items or refine your table layout without going through the Menus / Tables sections of the regular dashboard.
- You delegated a step to a manager and want to check whether they've finished.
Common questions
Can I add more restaurants later?
Yes. After onboarding, go to Organization → Locations → Add location to add another restaurant under your account. If you're on a plan that supports it, you can group them into a chain from there.
Can I rename my chain after creating it?
Yes. Go back to the Restaurant details screen and edit the Chain or group name field. Click Continue to save.
How do I remove a chain I created by mistake?
On the Restaurant details screen, click the Remove chain link under the chain field. You'll be asked to confirm. Your restaurant stays — only the chain grouping is removed.
What if I picked the wrong plan?
You can change plans anytime from Organization → Billing. Your data stays; only what features are enabled changes. During your trial, you can switch plans freely with no charge.
I clicked Skip on a step. How do I do it later?
Open your avatar (top-right of any dashboard page) and choose Onboarding Setup. That takes you to the setup summary, where every skipped step has an Edit link that reopens it. The screens look identical to the wizard.
I delegated to my manager but want to take it back
Open Onboarding Setup from your avatar menu and find the step in the Handed to your team panel, above the setup summary. Click Take it back. The step is yours again straight away, and the invitation in your manager's email stops working, so they can't pick it up afterwards.
You can take a step back whether or not they've accepted it — only a step they've already finished can't be taken back. If they're simply slow to respond, try Resend invite first. See Steps handed to your team for everything the panel shows.
What's the difference between Manager, Floor manager, and Chain manager?
- Manager runs a single location end-to-end: orders, staff, menu, settings.
- Floor manager runs the front of house at a location: tables, orders, sections. Doesn't have access to billing or menu changes.
- Chain manager oversees multiple locations in your chain. This role only appears if you've added a chain.
See the Roles & Permissions guide for a full breakdown.
Troubleshooting
I'm stuck on the same screen — clicking Continue doesn't move me forward
- Check that all required fields (marked with
*) are filled in. - Look for red error text next to a field. The screen scrolls to the first error if there is one.
- If you're on the Restaurant details screen and the legal business name is already taken on our system, you'll see an inline message. Try a more specific name (e.g., Mario's Pizzeria — Downtown).
The "Continue" button stays disabled
Usually means a required field is empty or the email format is invalid. Check each field for the asterisk (*).
I delegated a step but my manager says they got an error
Most common cause: the role you picked doesn't match what your plan supports. Try a different role from the dropdown. Less common: their email doesn't match the one you typed exactly — double-check spelling.
If they hit a Role can't complete this step message, the system will suggest valid roles in the error. Switch to one of those and resend.
I can't connect Stripe/Clover
- Make sure your address and country on the Address screen are correct — payment processors check those.
- Have your business documents handy (legal name, tax ID, bank info).
- Stripe sometimes takes a few minutes to load. Refresh and try again if the page is blank.
Something else
Email support@ssppos.com with a screenshot. Most issues are resolved within a couple of hours during business hours.
What's next
Once you've finished onboarding:
- Set up your menu in detail — add photos, descriptions, modifiers.
- Configure your floor plan — sections, table assignments, NFC tags.
- Invite your full team — staff, kitchen, cashiers.
- Set up printers — receipts and kitchen tickets.
- Configure taxes in detail — multiple categories, exemptions, by-item overrides.
🎉 You're all set. Welcome to SSP Manager.